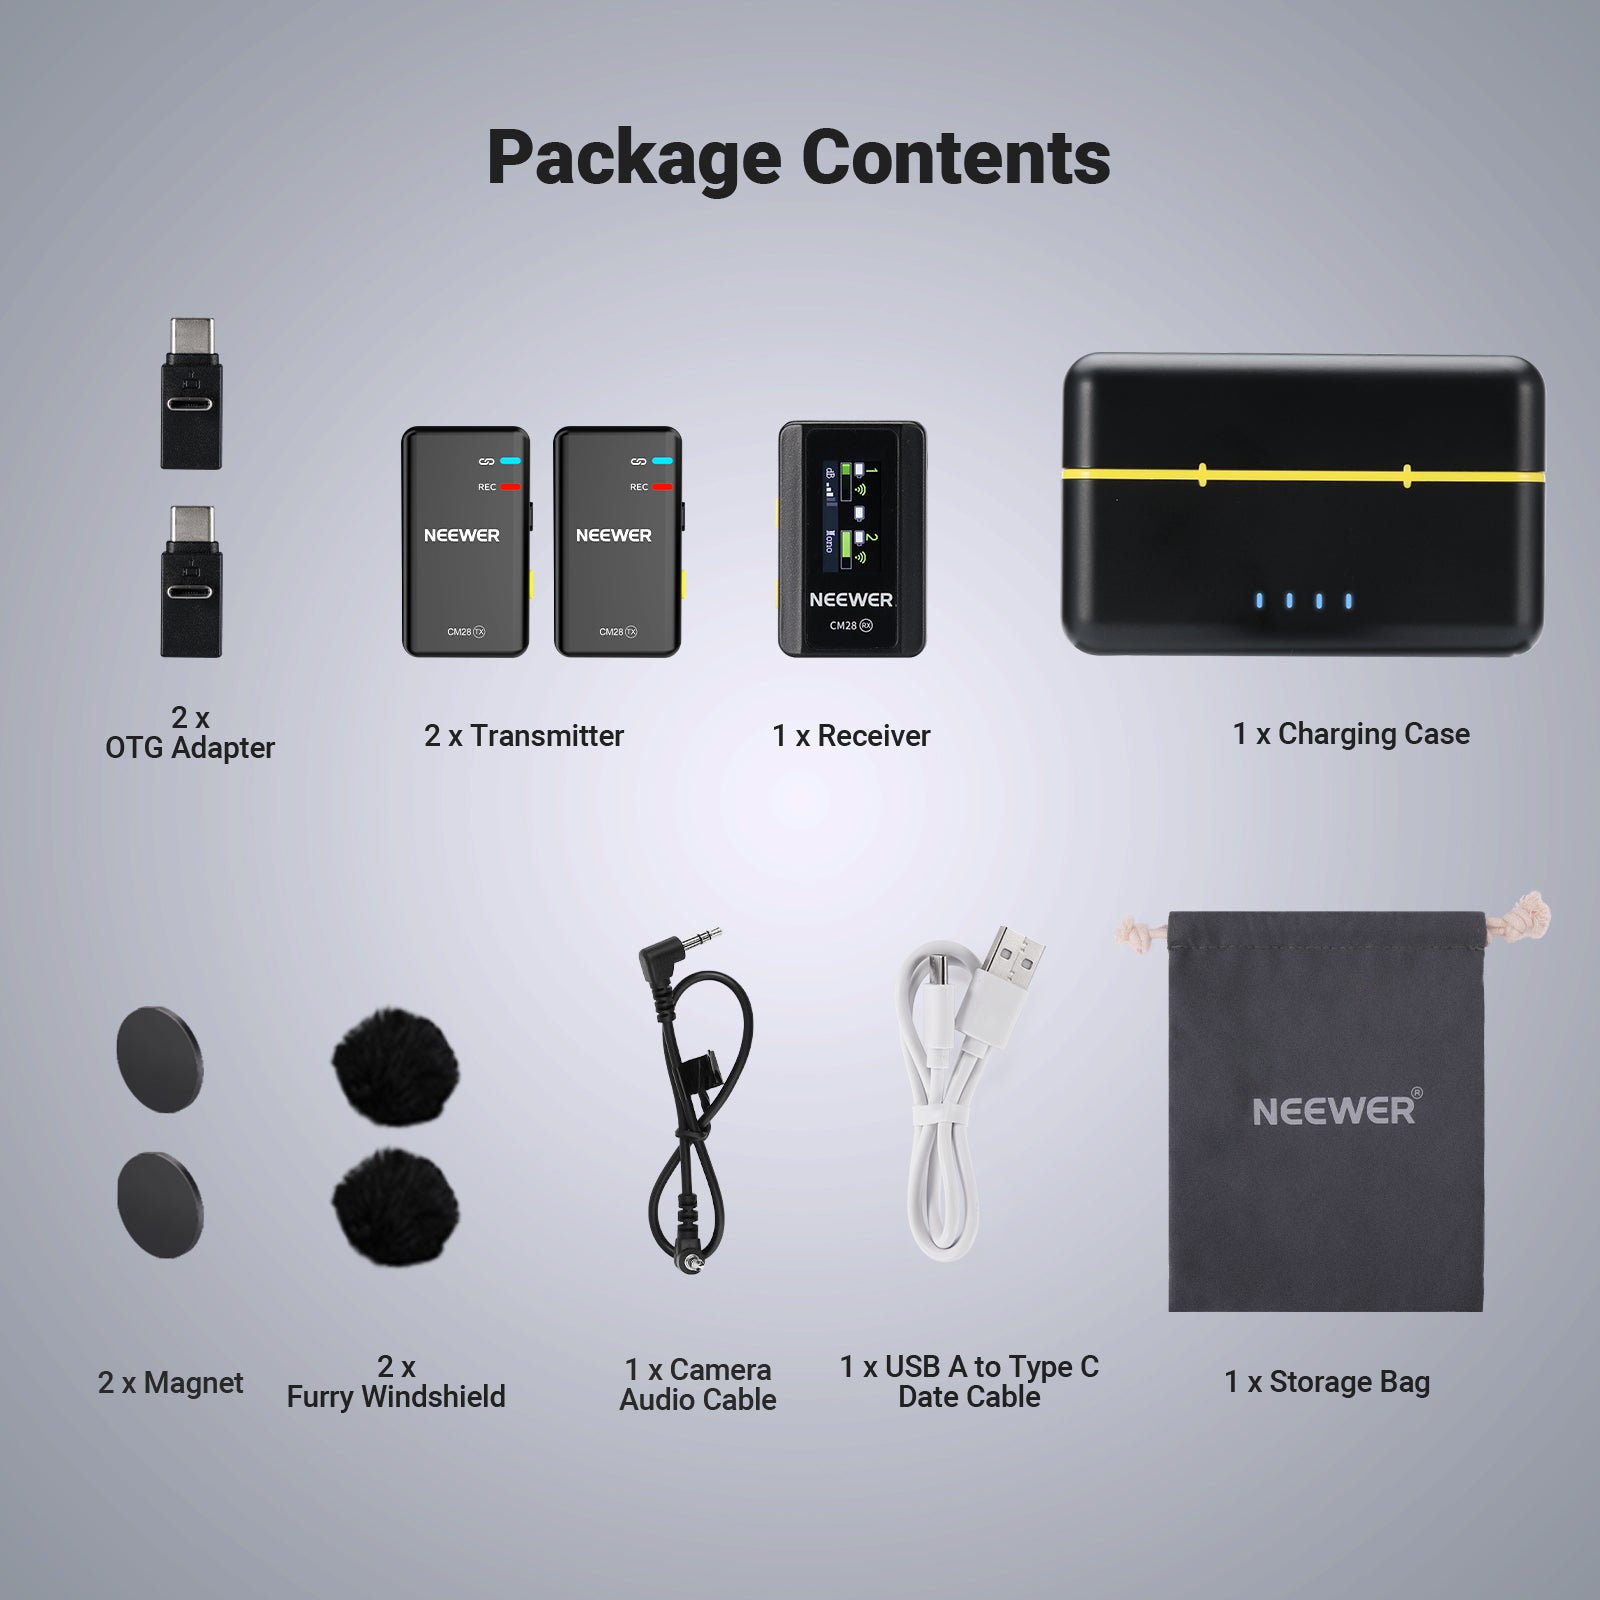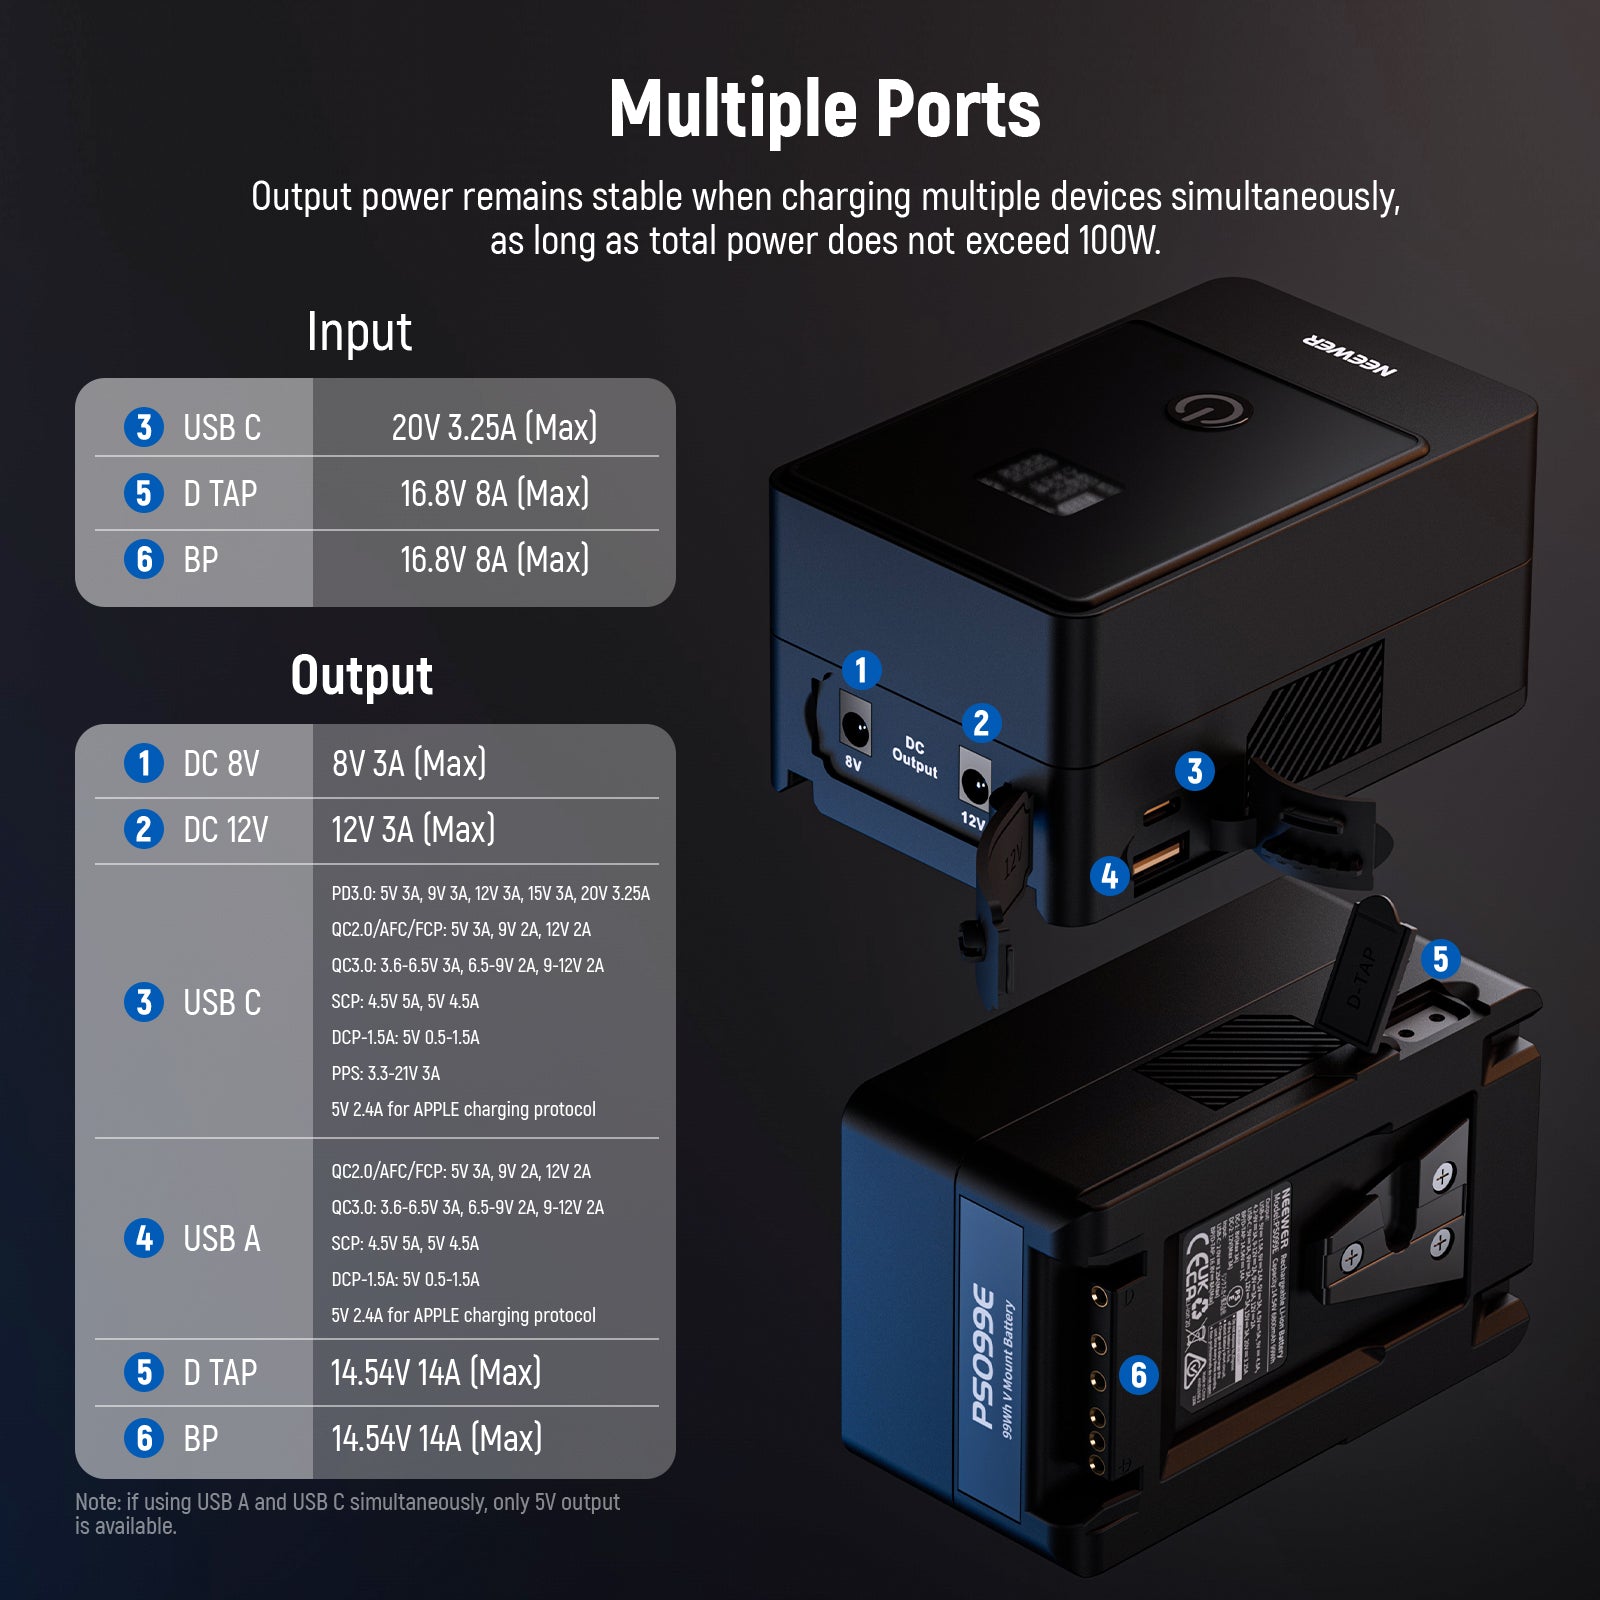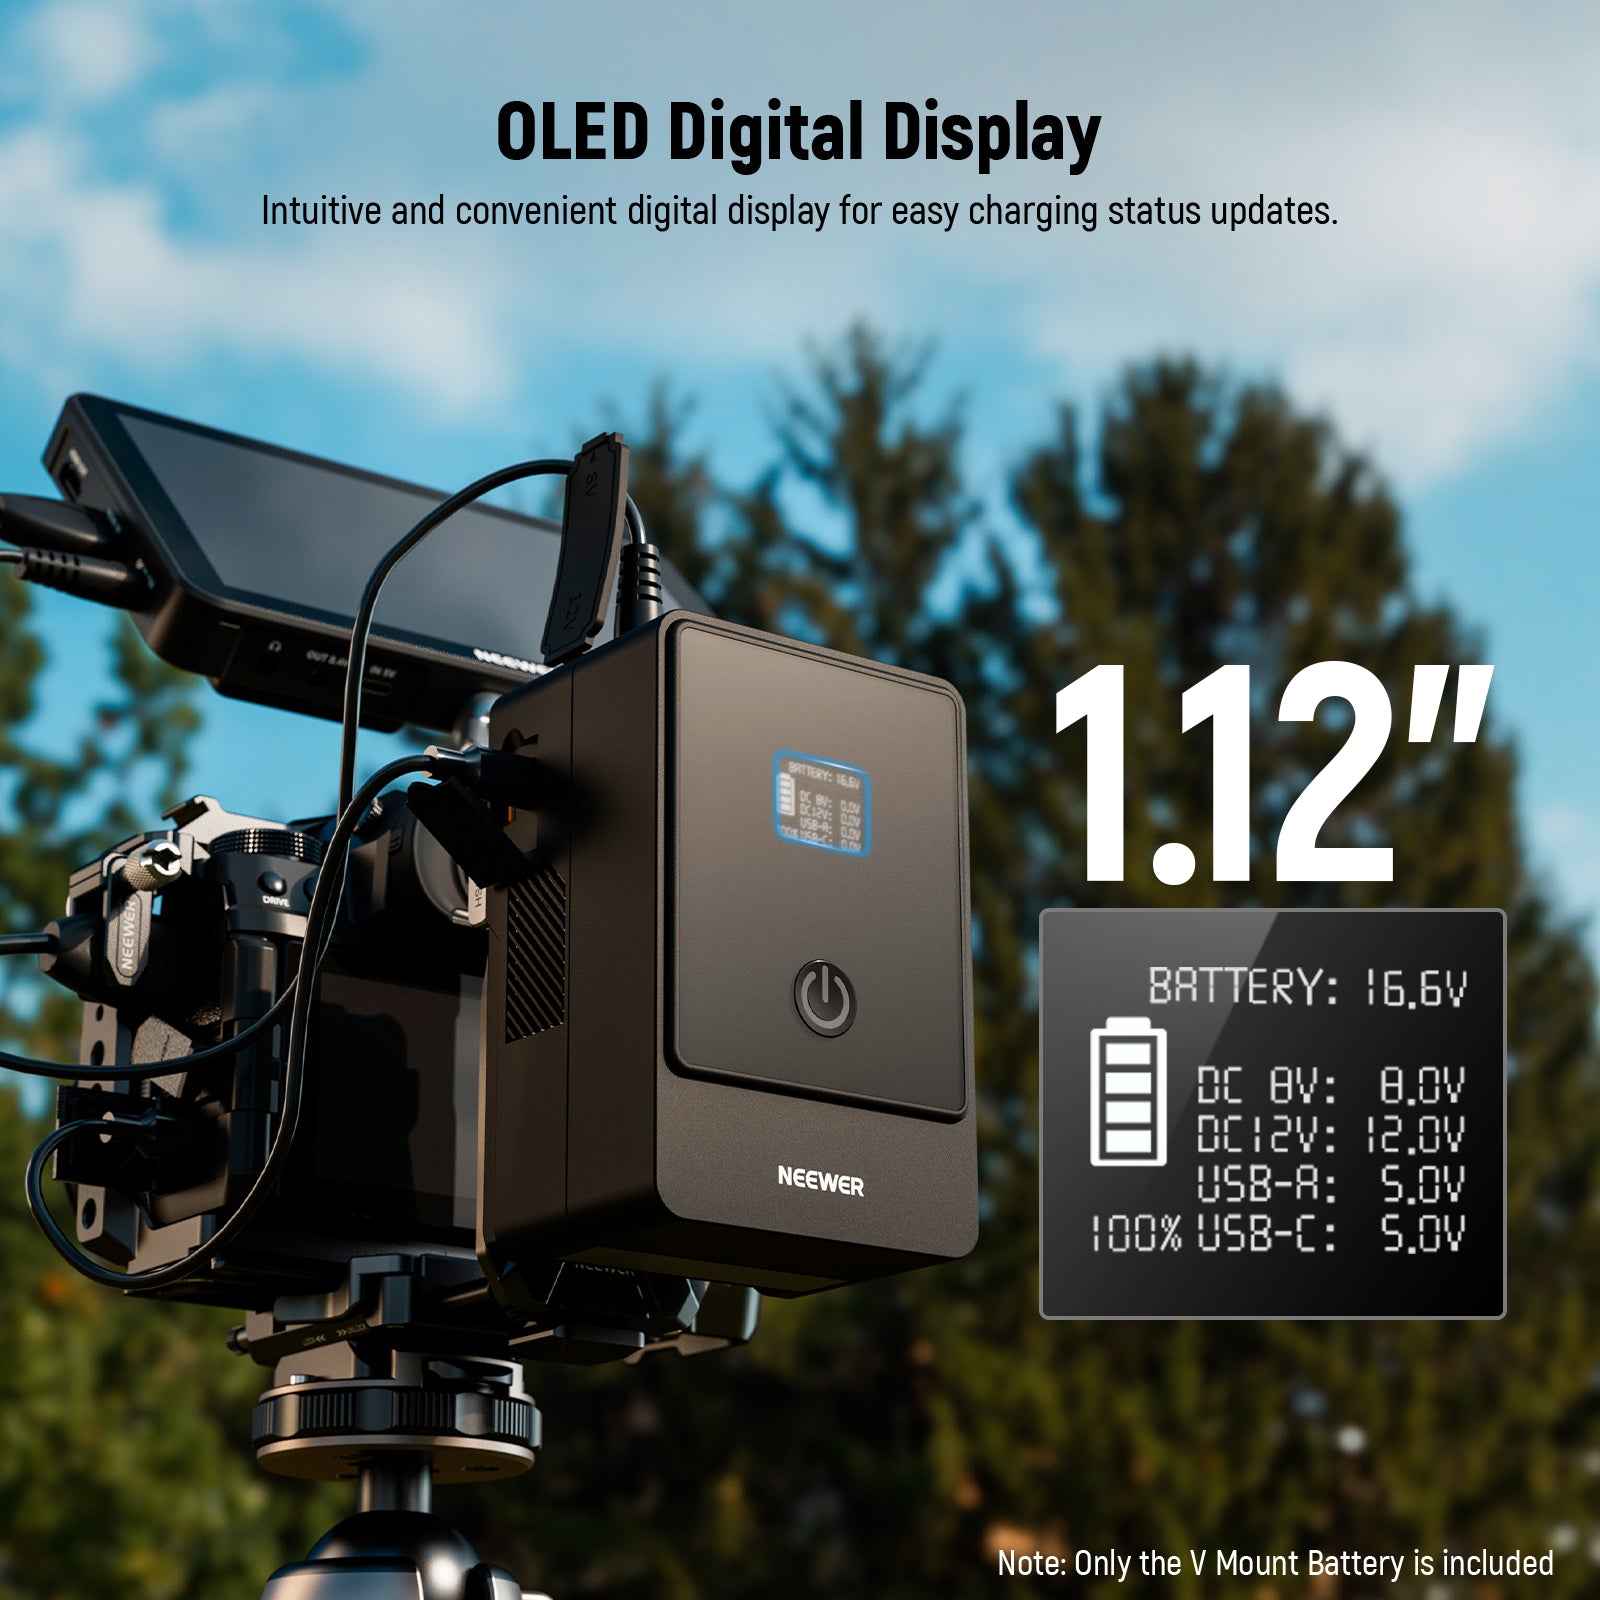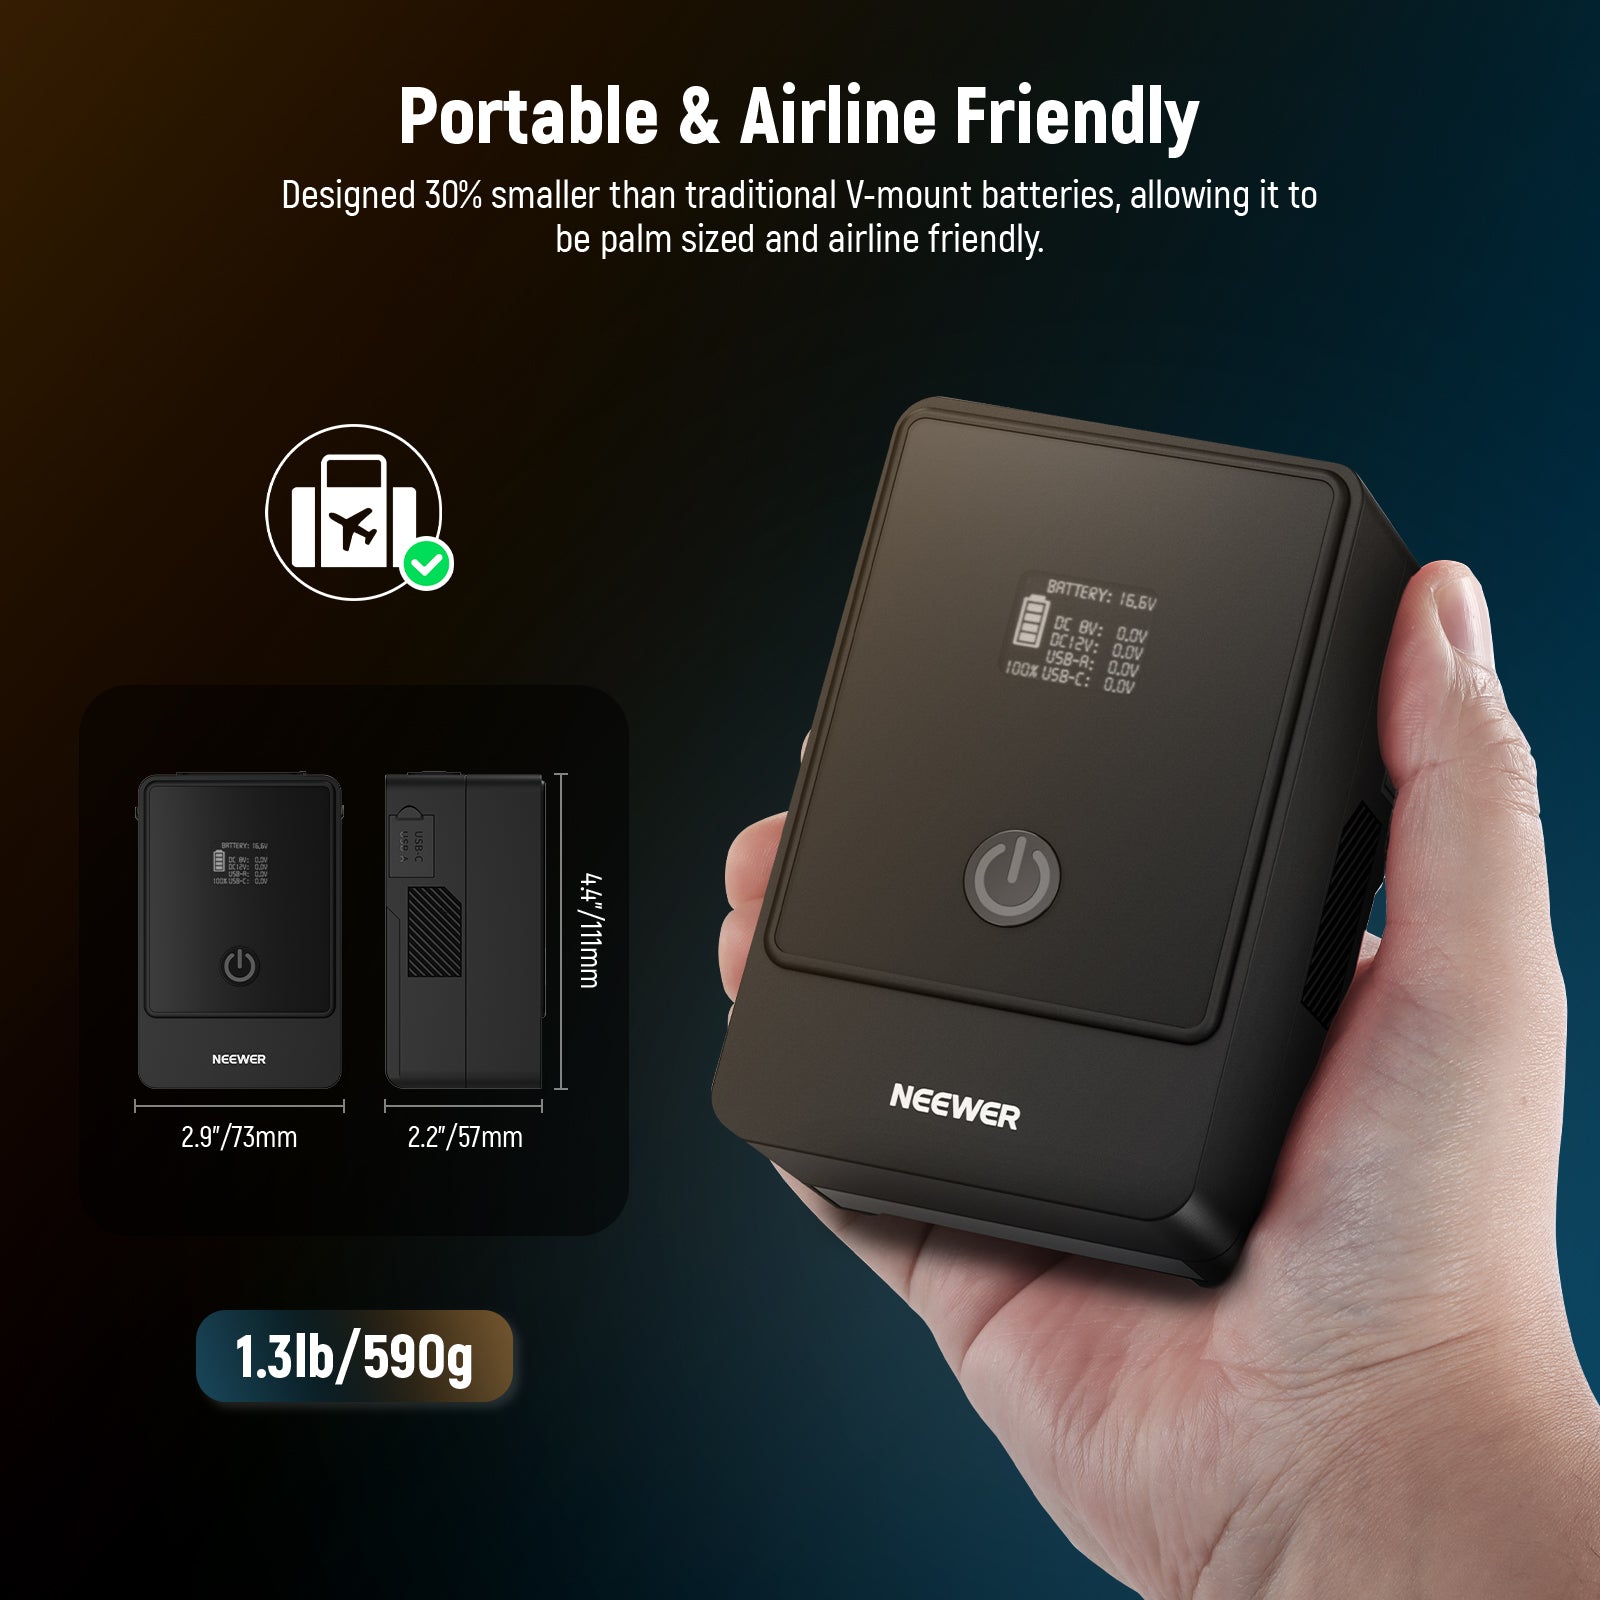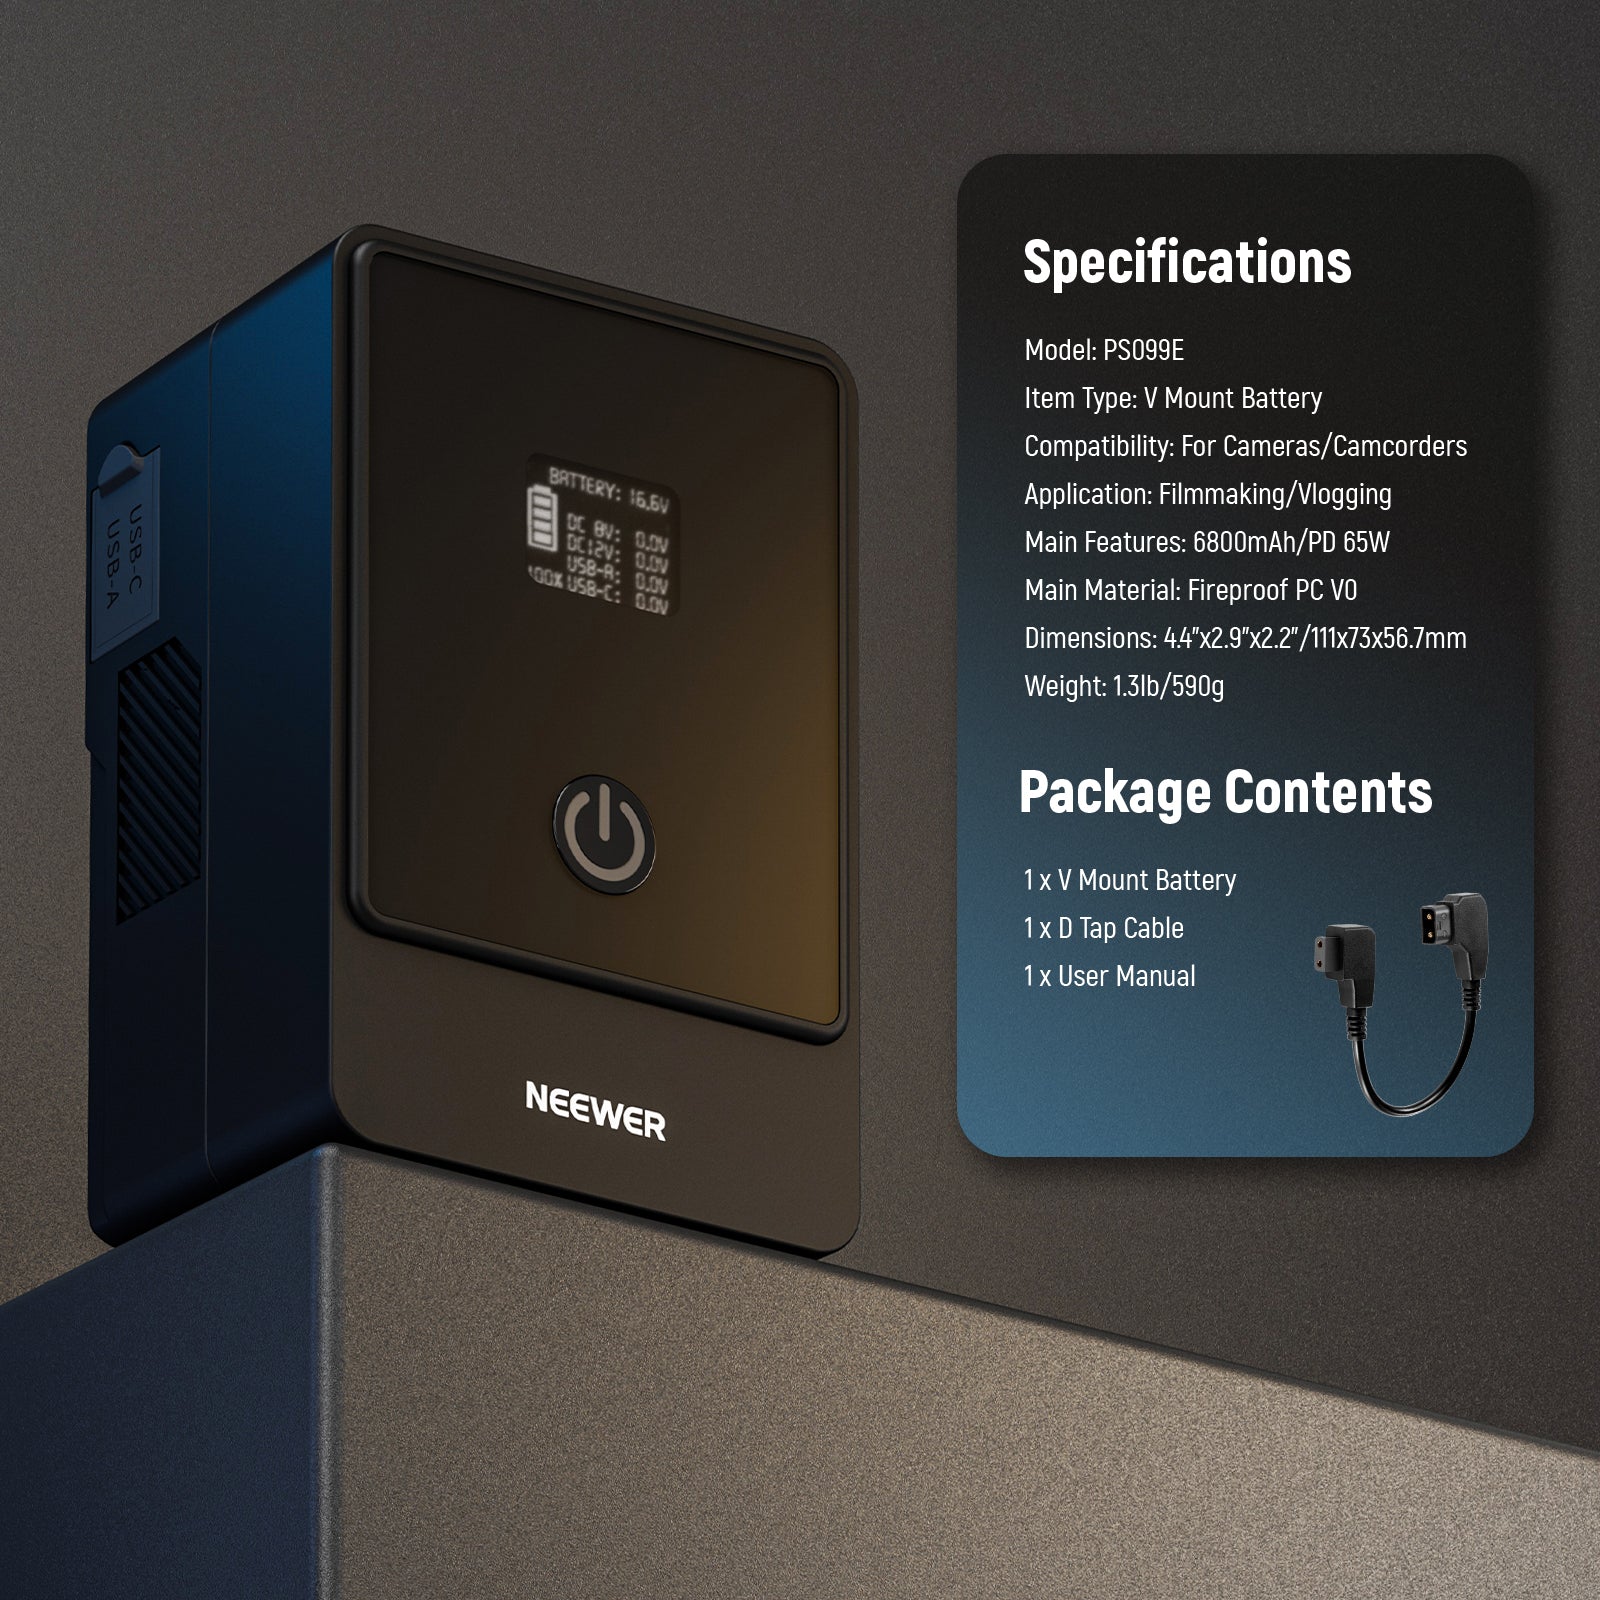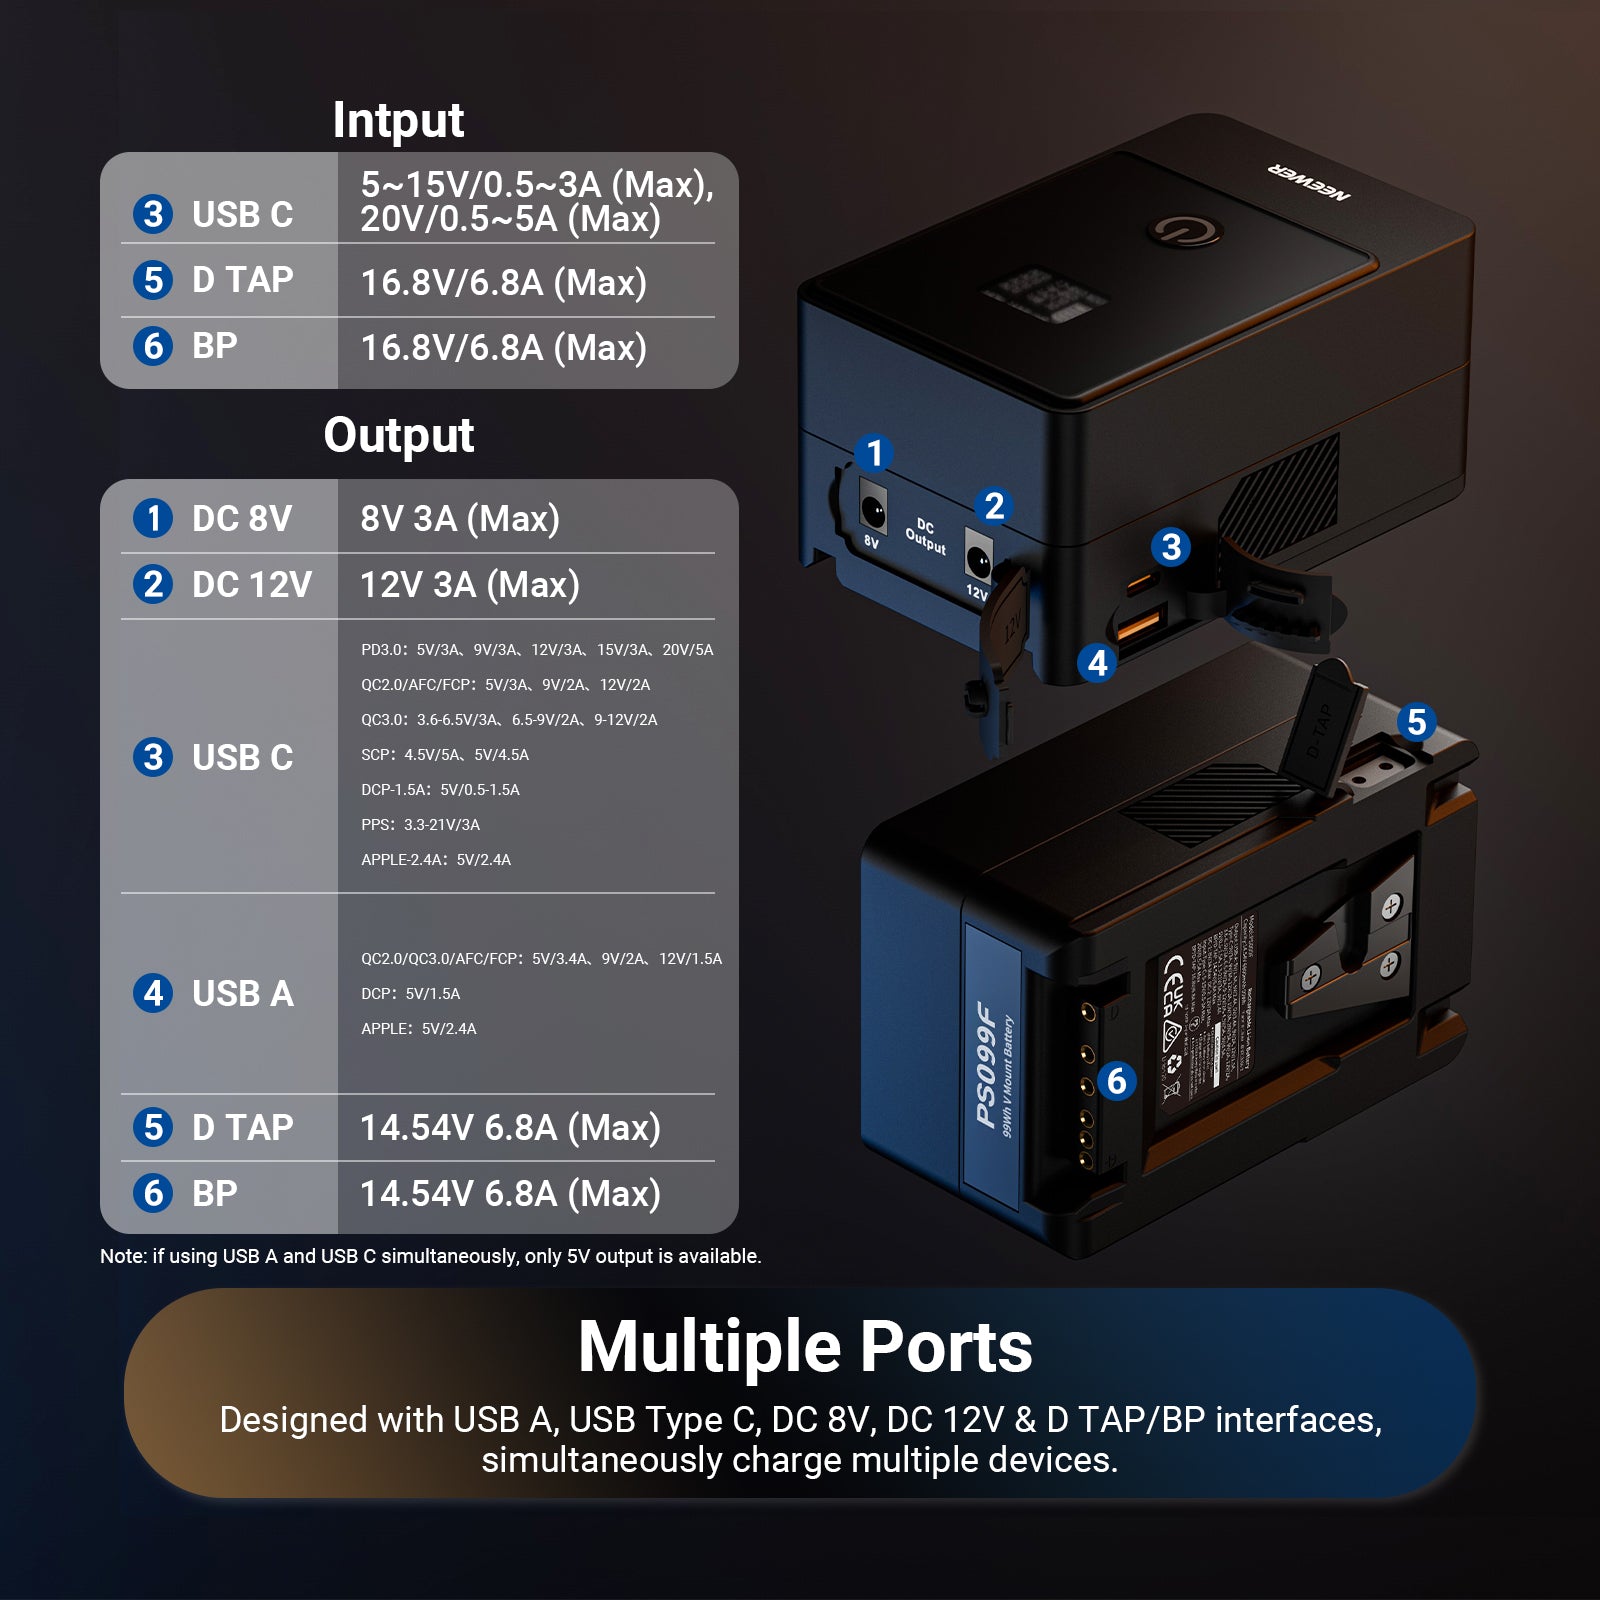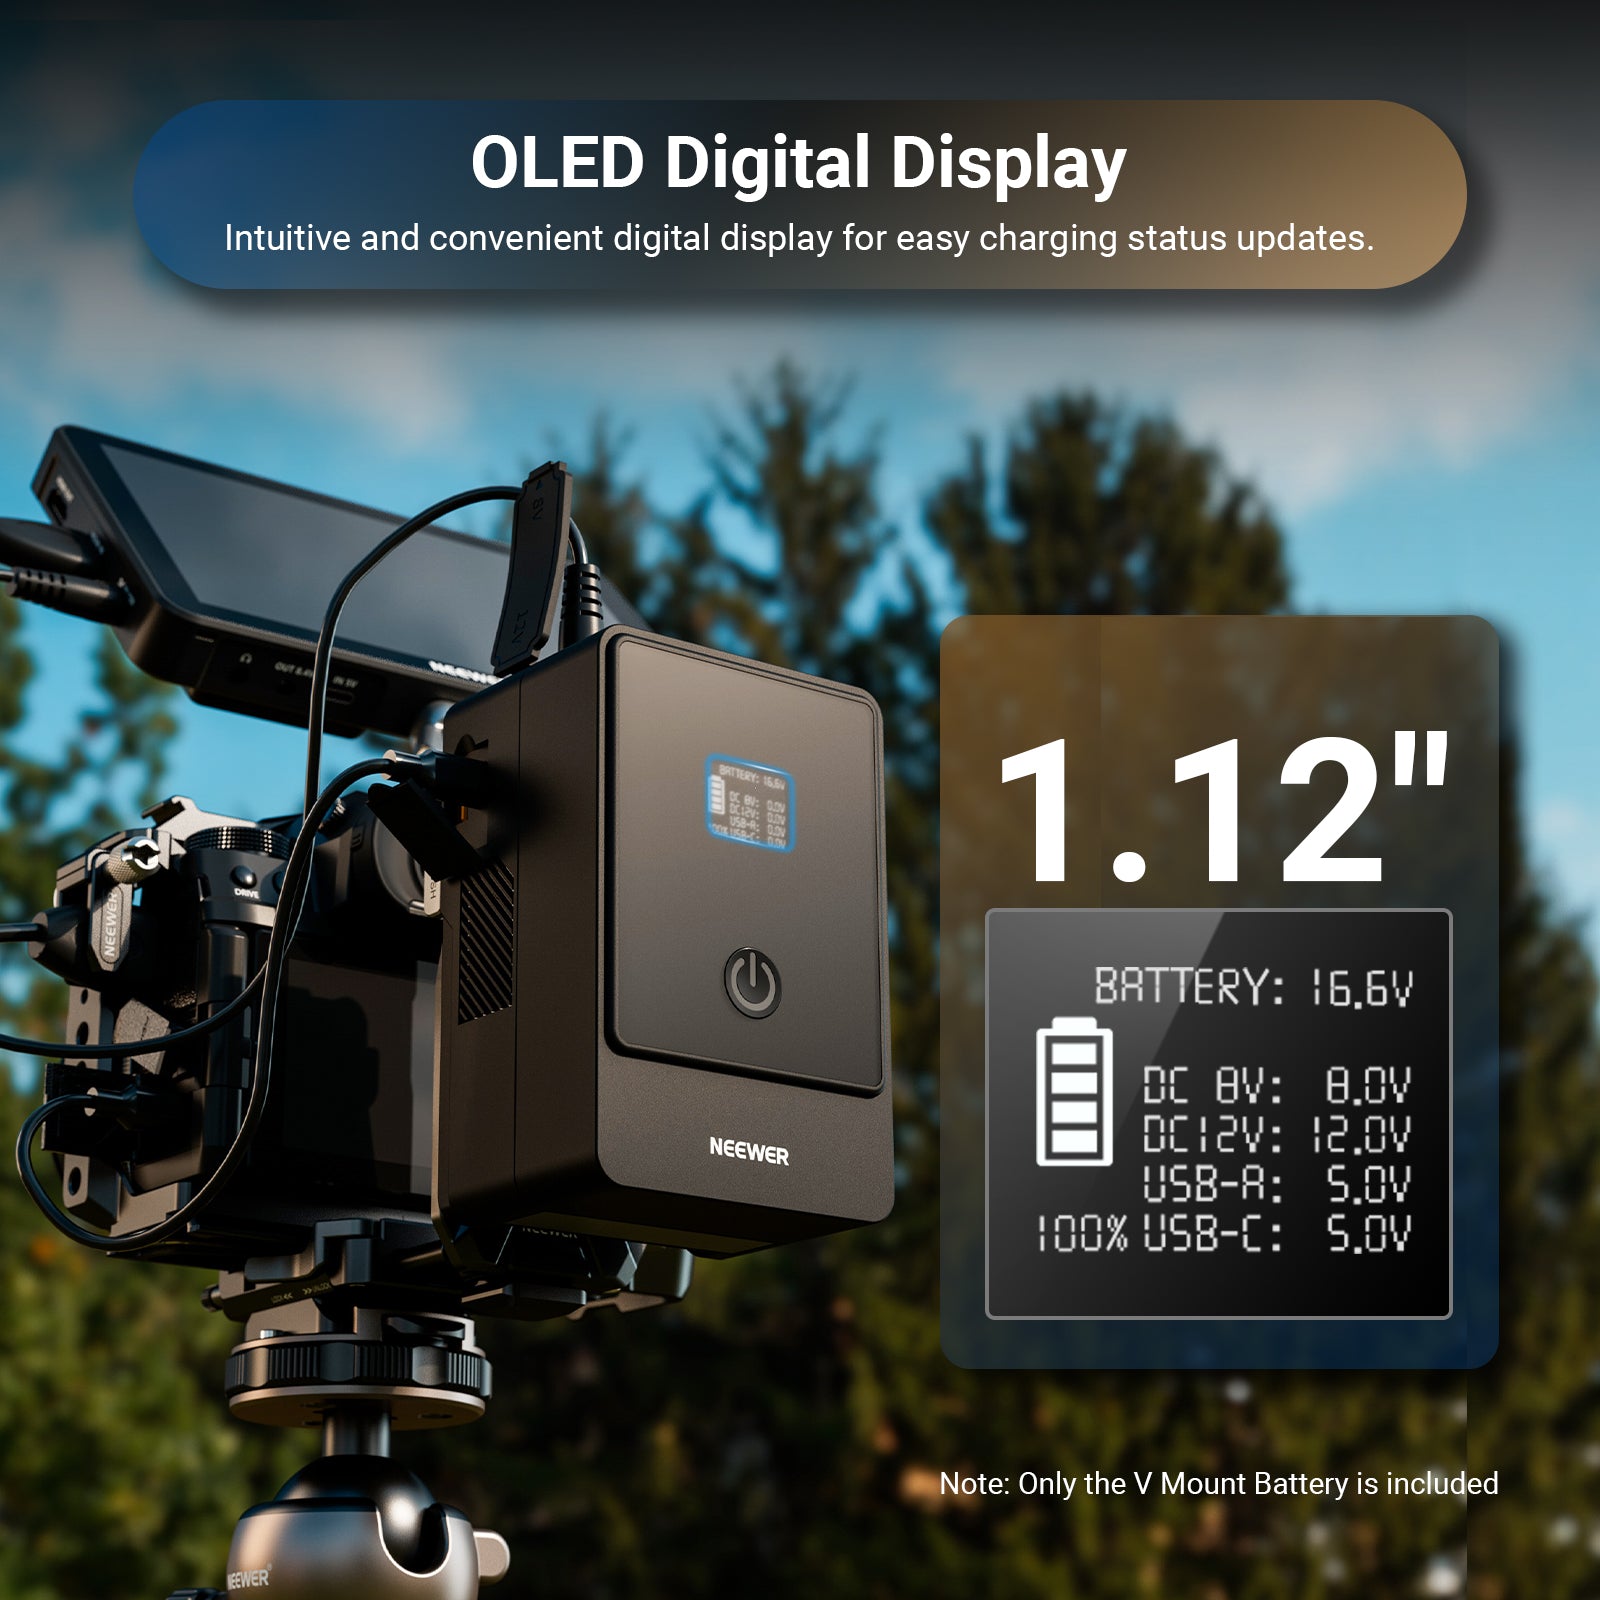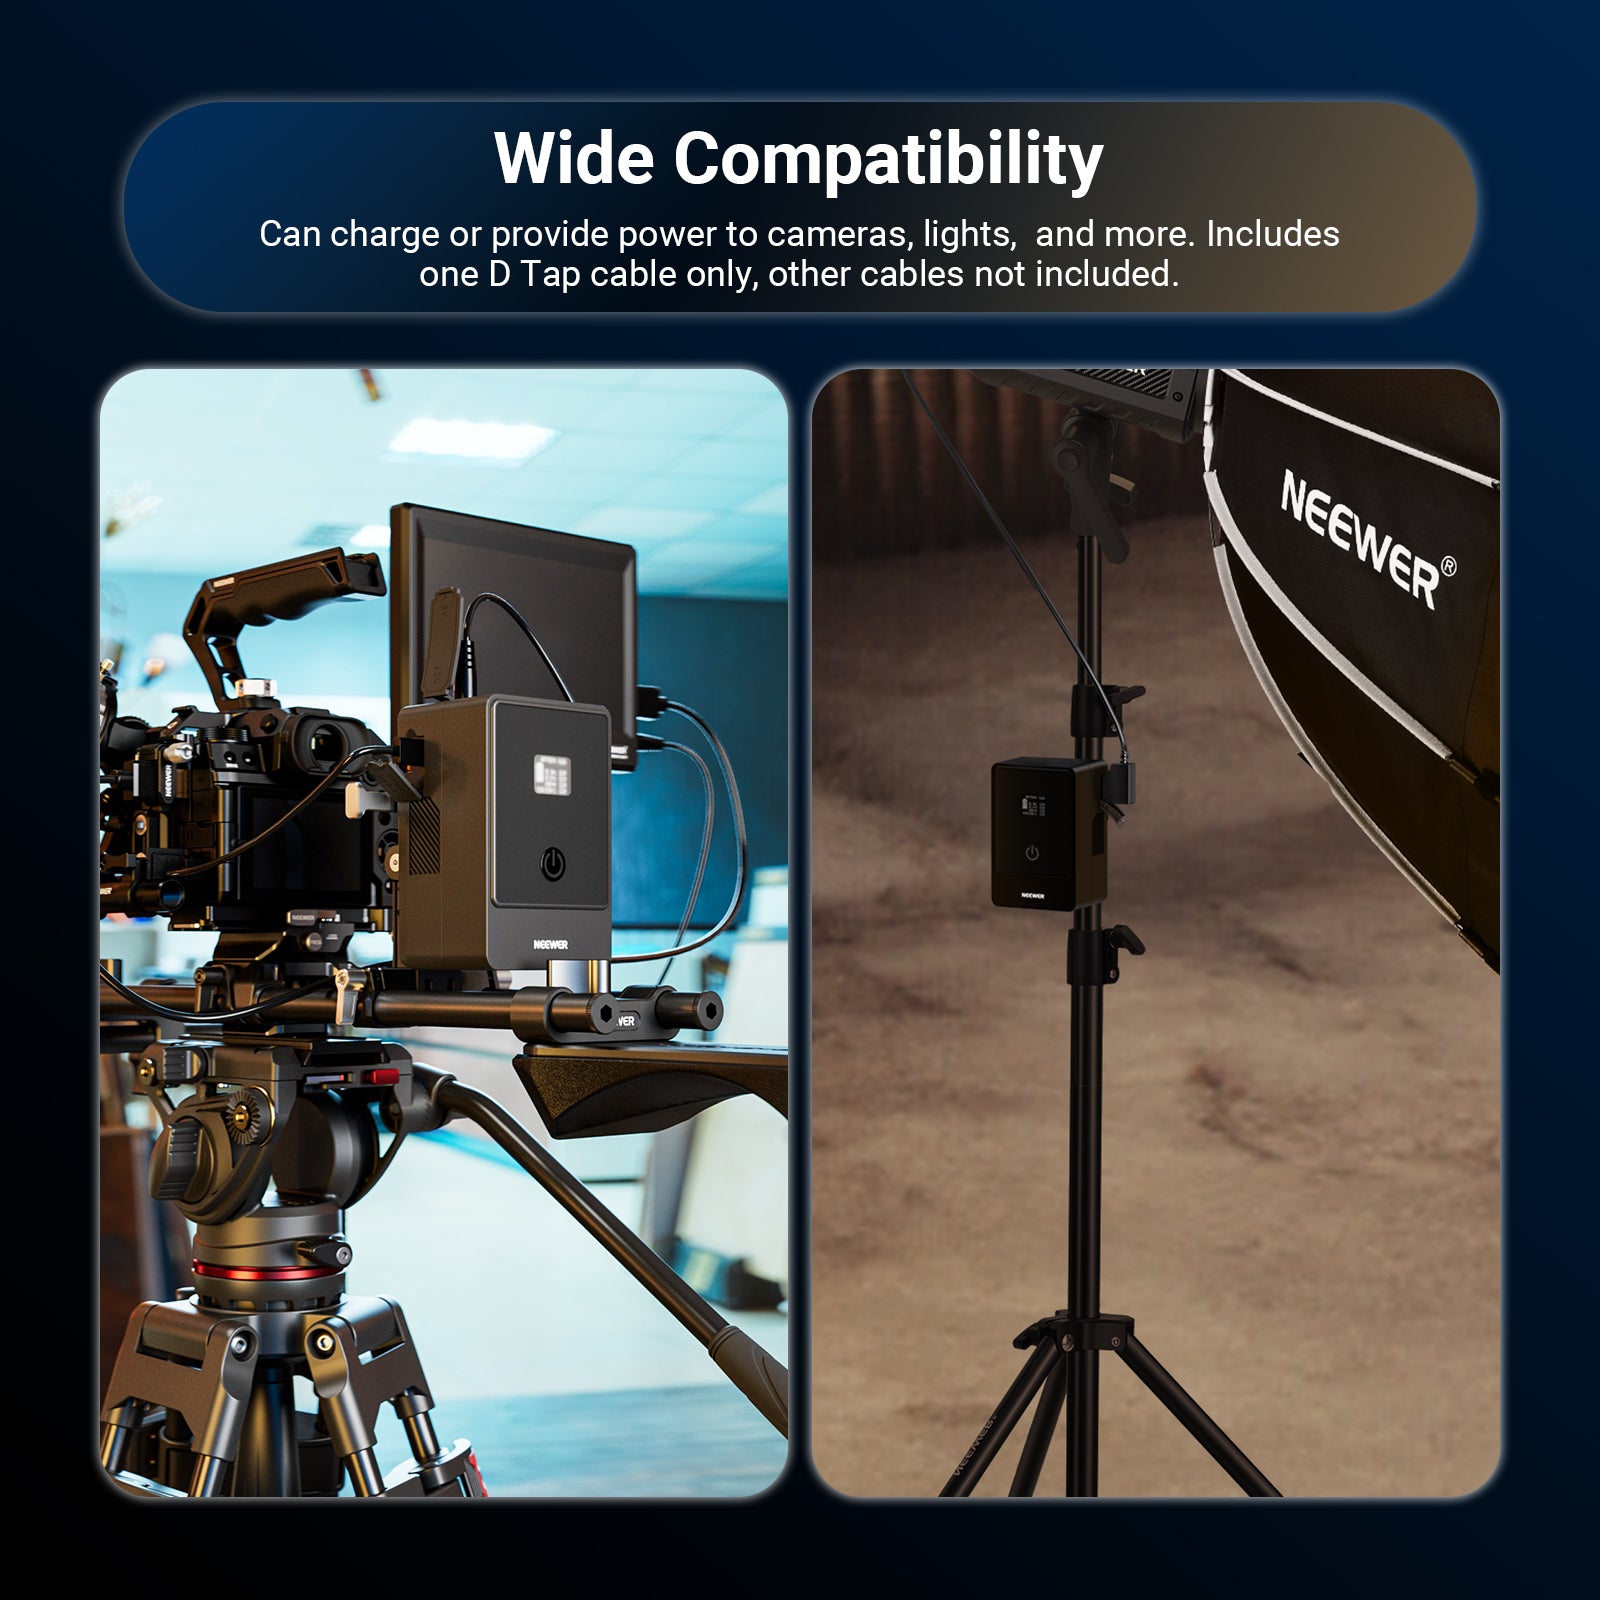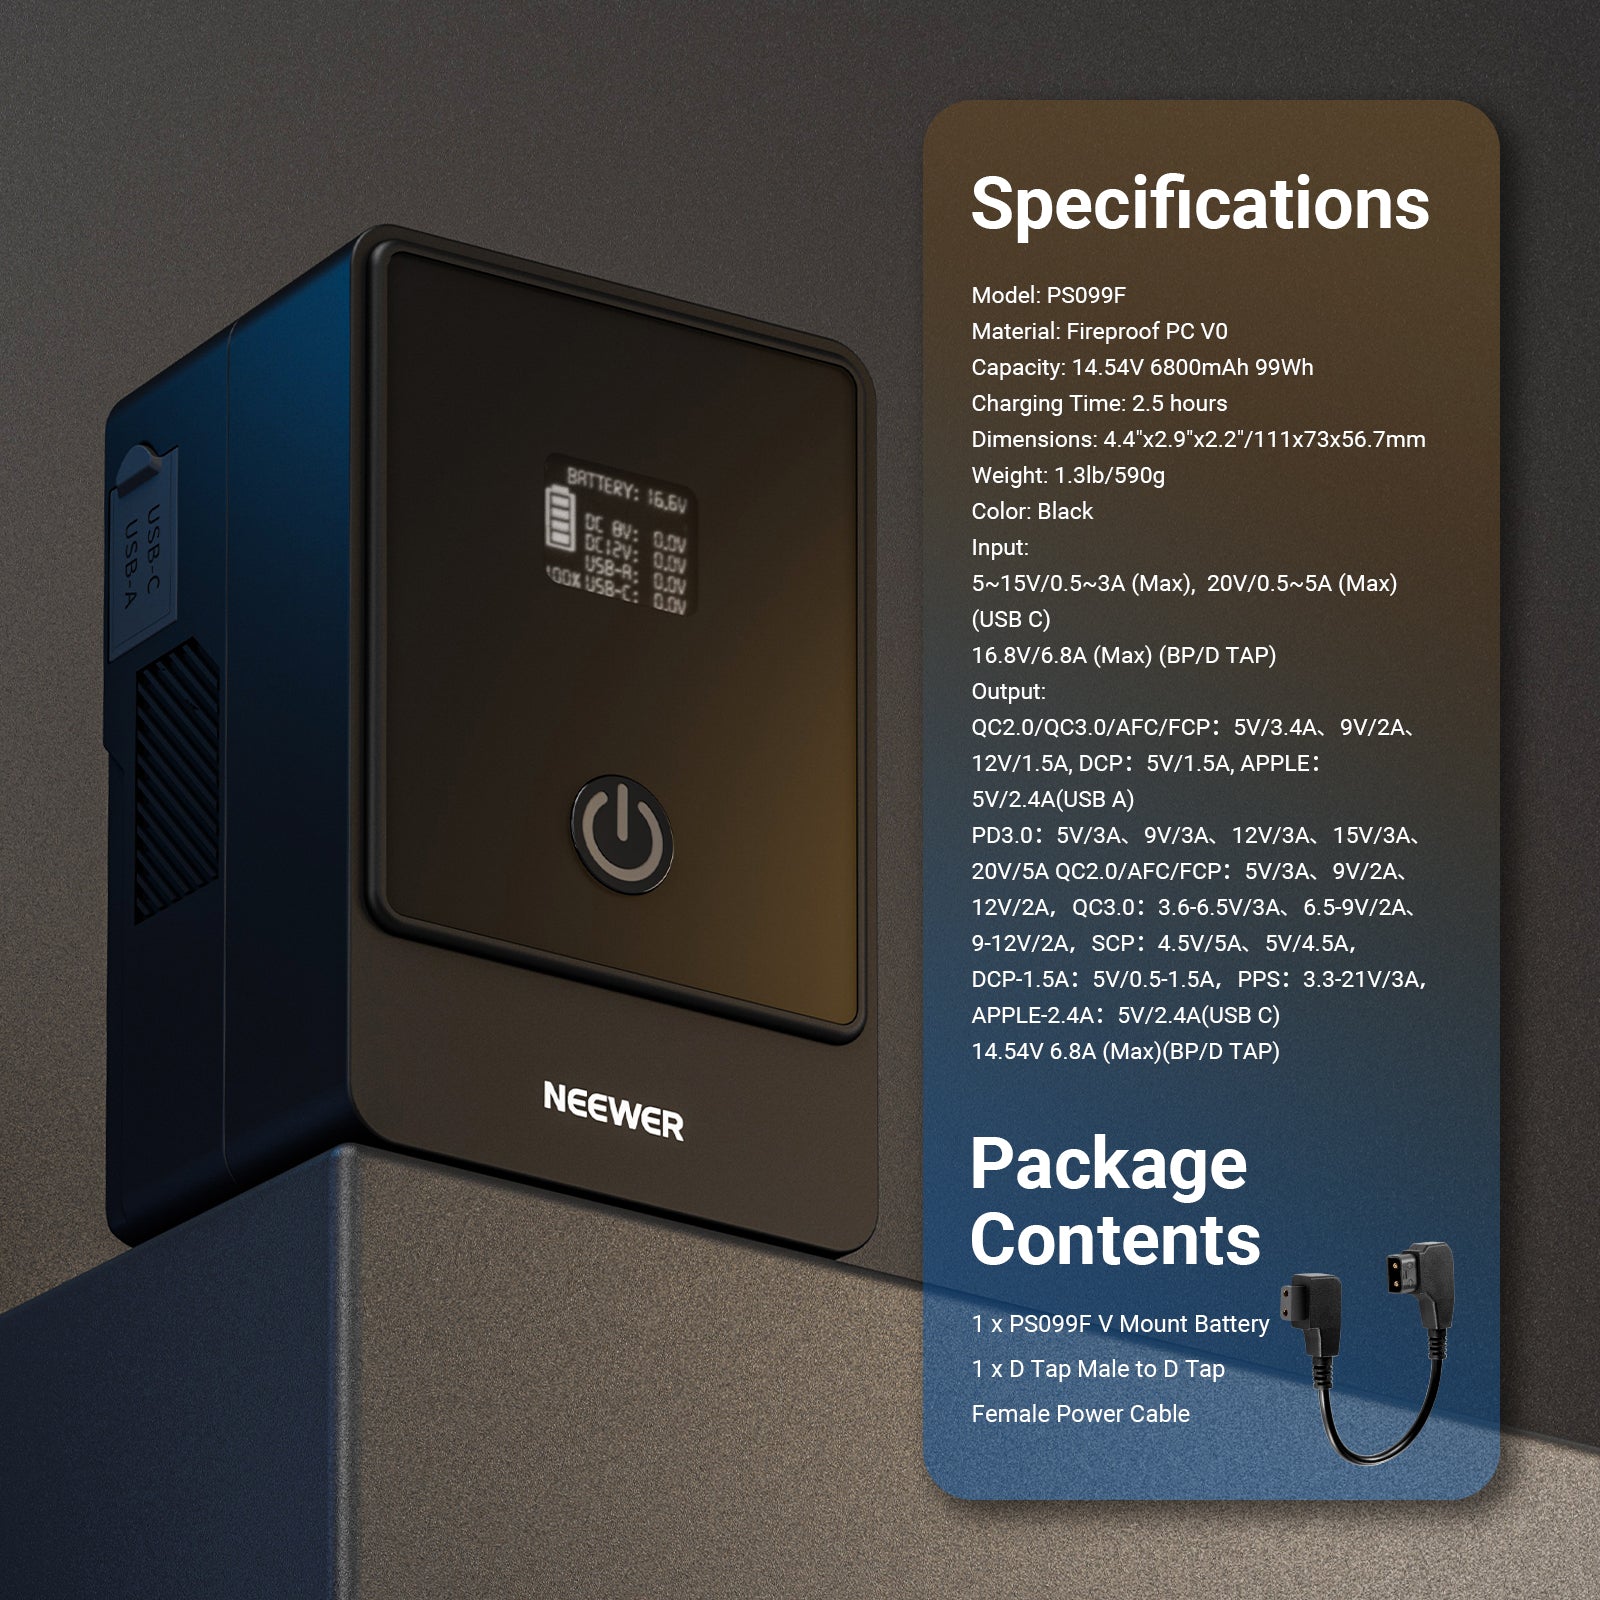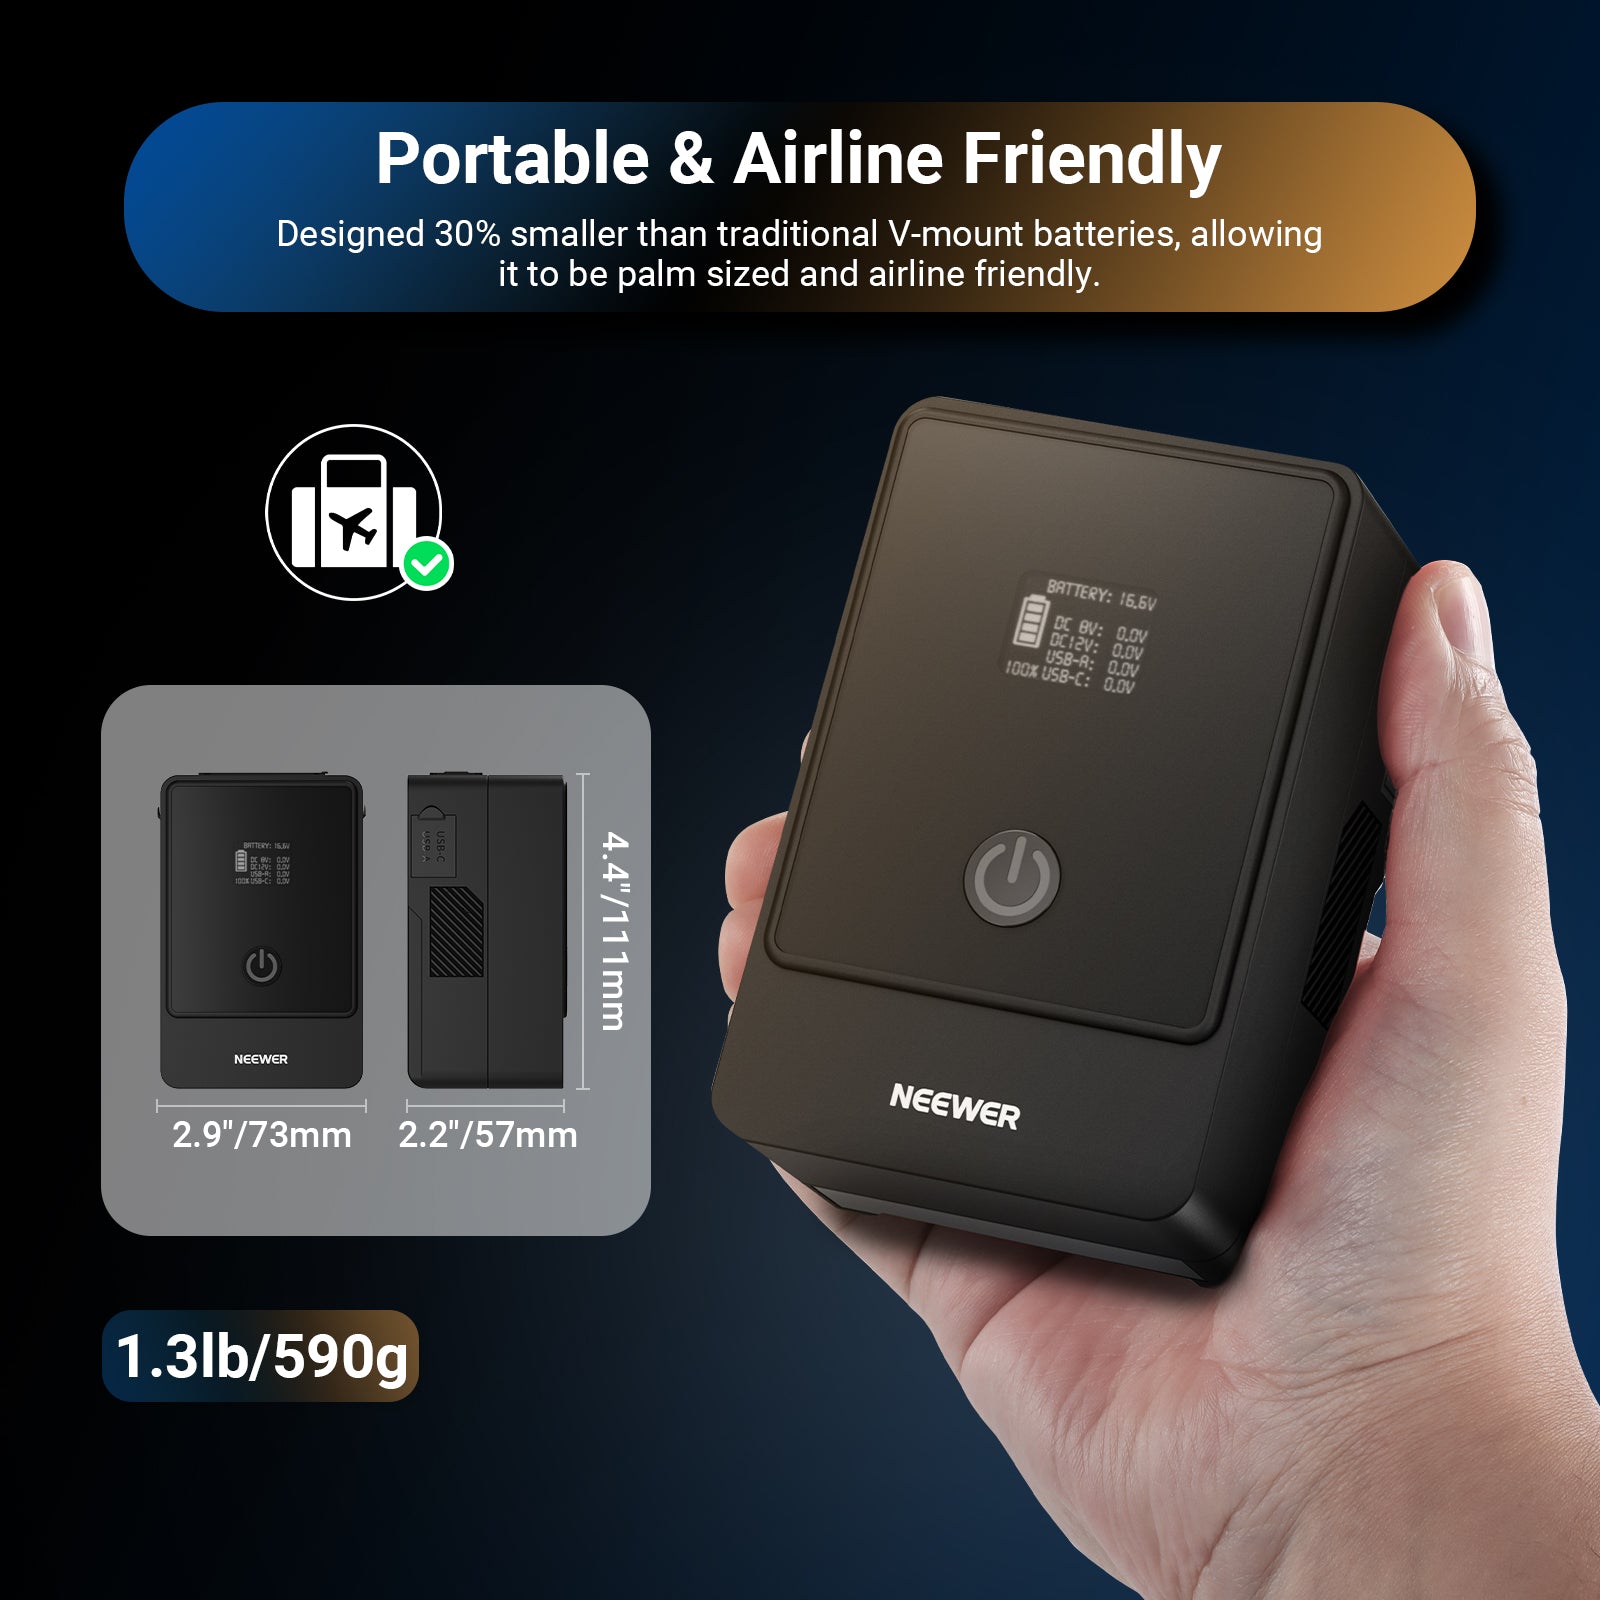


Table of Contents
If you’re a photographer, videographer, or even a casual shooter looking to steady your shots without sacrificing flexibility, you will likely weigh the pros and cons of single-legged and three-legged supports. The debate between monopods and tripods boils down to one key question: what do you need most—unshakable stability or on-the-go convenience? This guide breaks down what a monopod is, its core uses, how it stacks up against tripods, and how to make the most of this versatile tool.
What Is a Monopod?

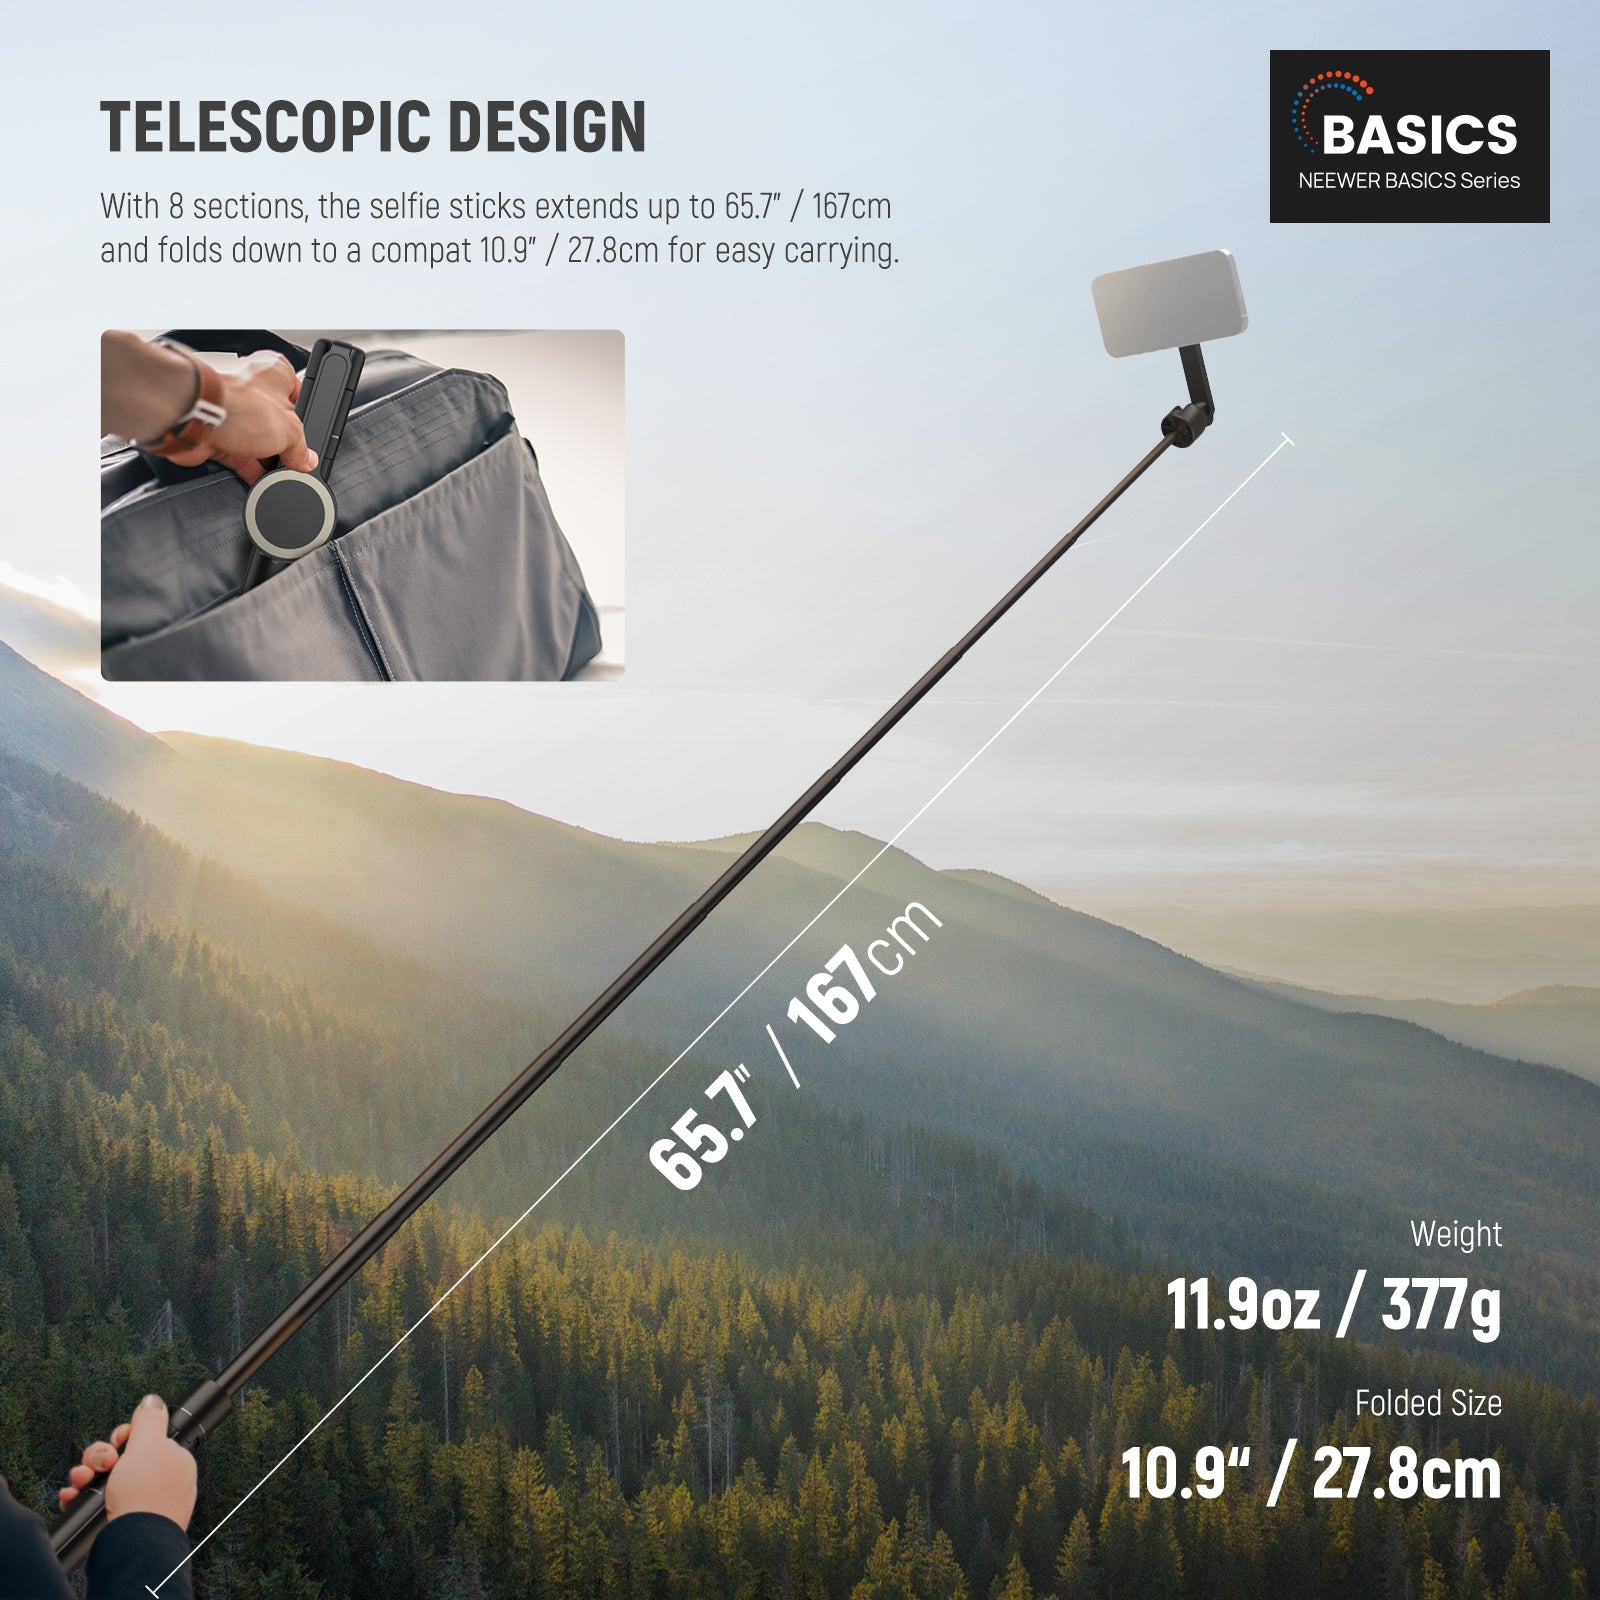
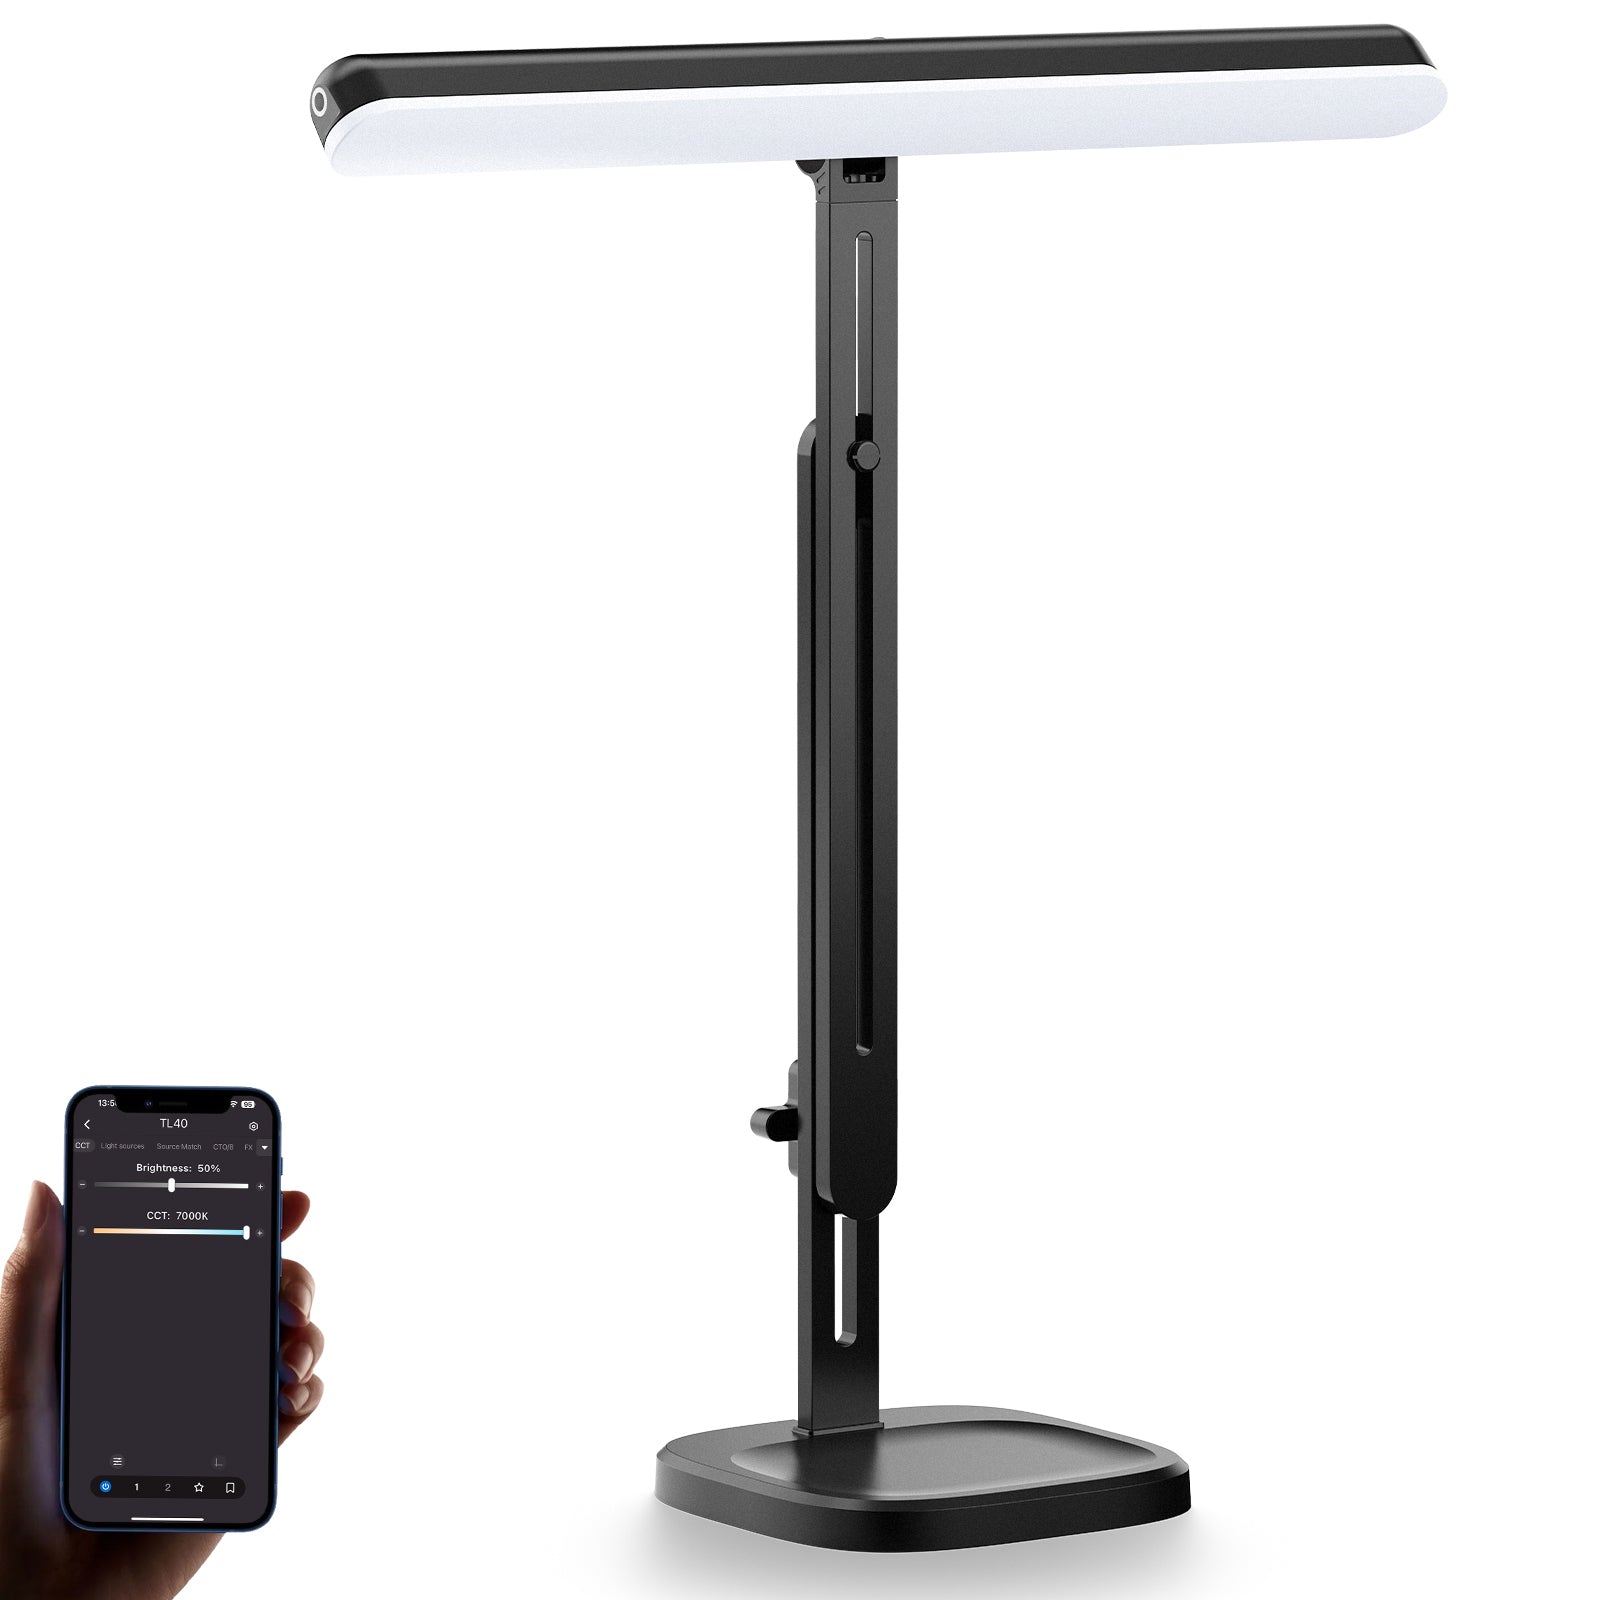
A monopod is a telescoping pole designed to support cameras, camcorders, binoculars, or spotting scopes. Unlike tripods, which rely on three legs for full stability, monopods use a single adjustable leg to reduce camera shake and distribute weight — making it faster to set up, easier to carry, and ideal for shooting on the go. Photographers use it when they need steadier shots but don’t have time or space for a full tripod setup.
Constructed from materials like aluminum, carbon fiber, or magnesium alloy, modern monopods balance durability and portability. Its simplicity is its greatest strength: no complicated setup, no bulky legs to maneuver, just a straightforward tool that adds stability without slowing you down. Below is a comparison of tripods made from different materials.
|
Material |
Weight (Average) |
Vibration Dampening |
Price Range (2025) |
Best For |
|
Carbon Fiber |
0.8–1.5 lbs |
Excellent |
$100–$250 |
Travel, long shoots |
|
Magnesium Alloy |
1.2–2.0 lbs |
Good |
$60–$180 |
Everyday use, outdoor shooting |
|
Aluminum |
1.8–3.0 lbs |
Fair |
$30–$100 |
Budget-friendly, casual use |
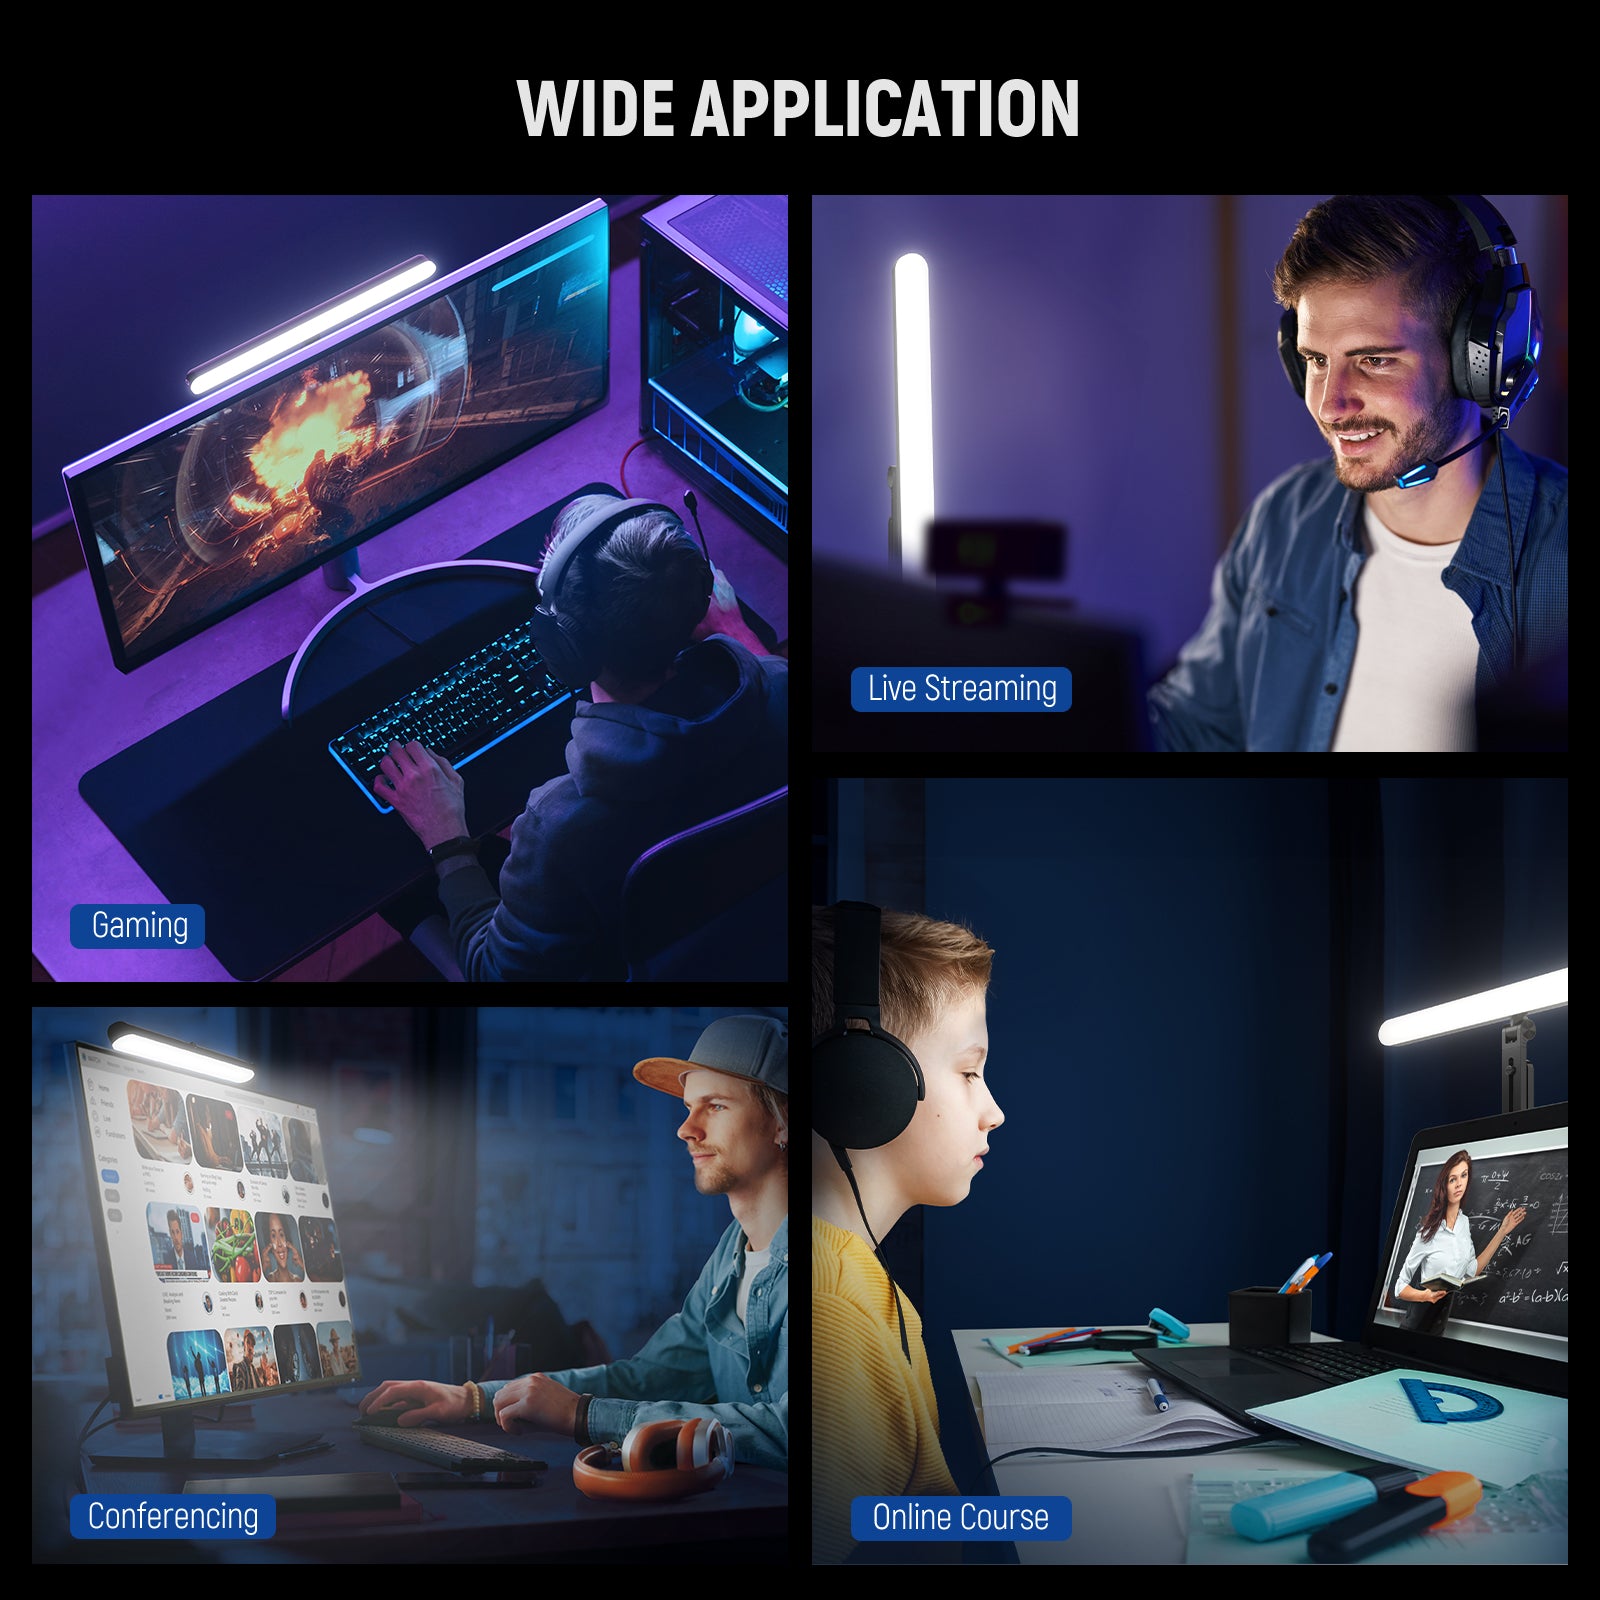
What Is a Monopod Used For?

1. Stay Light and Mobile on the Move
Whether you’re covering a wedding, chasing wildlife, or navigating a crowded concert, being able to move quickly is non-negotiable. Tripods often feel cumbersome in these settings—setting them up takes time, and they can get in the way of other people or subjects. Monopods, by contrast, fold down to 16 to 24 inches and fit easily into a camera bag or even a backpack side pocket.
A 2025 survey by the Professional Photographers of America (PPA) found that 78% of event photographers prefer monopods for indoor shoots, citing “fast repositioning” as the top benefit. For example, when capturing a bride walking down the aisle or a musician jumping on stage, you can swing the monopod into place in seconds, without missing a critical moment.
2. Take Stability with You Outdoors
Outdoor environments—from rocky trails to windy hilltops—present unique challenges for keeping shots steady. While tripods offer superior stability on flat ground, they struggle on uneven terrain or in tight spaces like narrow hiking paths. Monopods adapt to rough surfaces by using your body as a secondary stabilizer: plant the base firmly on the ground, lean into the pole, and use your legs and core to steady the setup. The following shows the usage rate of monopods in outdoor settings. Source: Outdoor Photography Gear Review 2025, “Stability Tools for Adventure Shooters”
|
Outdoor Scenario |
Monopod Usage Rate (2025) |
Tripod Usage Rate (2025) |
Key Benefit of Monopod |
|
Backpacking/Hiking |
69% |
23% |
Fits in a backpack, works on uneven trails |
|
Wildlife Photography |
58% |
41% |
Quickly track moving animals |
|
Beach/Rocky Shores |
72% |
35% |
Stable on shifting sand/rocks |
3. Shoot Longer Without Getting Tired

Hand-holding a camera—especially with a heavy lens—takes a toll on your arms, shoulders, and back. A 2025 study by the American Society of Media Photographers (ASMP) found that photographers who hand-hold for 2+ hours report a 37% increase in muscle fatigue, which can lead to blurry shots and reduced productivity.
Monopods distribute the camera’s weight to the ground, taking pressure off your upper body. For example, a 5-pound camera with a 3-pound telephoto lens feels nearly weightless when supported by a monopod. Sports photographers covering full games often swear by monopods, as they allow them to stay in position for extended periods without sacrificing shot quality.
4. Make the Most of Limited Shooting Space
Crowded venues—like concert halls, sports arenas, or indoor events—often have strict rules about equipment size. Many venues ban tripods outright due to their bulk, but monopods are almost always permitted. Their slim profile lets you squeeze into tight spots: between rows of seats, against walls, or even in crowds of people.
Even in open spaces with size restrictions, monopods excel. For example, some national parks limit tripod use on boardwalks to avoid blocking other visitors—monopods let you capture steady shots of waterfalls or wildlife without disrupting the flow of foot traffic. They’re the ultimate “stealth” stabilizer for situations where tripods are too obtrusive.
5. Keep Your Shots Steady and Sharp
At the end of the day, the primary goal of any stabilizer is to reduce camera shake—and monopods deliver on that front. While they don’t match tripods for absolute stability (tripods eliminate shake in calm conditions), they’re more than enough for most shooting scenarios.
Tests by Digital Camera World 2025 showed that monopods reduce blur by 65% when shooting at shutter speeds slower than 1/60th of a second. This is game-changing for low-light situations: indoor events, sunset shoots, or nighttime cityscapes. For example, shooting a wedding reception at ISO 800 with a 50mm lens? A monopod lets you use a shutter speed of 1/30th of a second without blur, resulting in brighter, more detailed photos.
Monopod vs. Tripod: Which Is Better?

The answer depends on your priorities. Tripods are unbeatable for static shots that require maximum stability—think landscape photography, long exposures, or time-lapses. Monopods, by contrast, are ideal for dynamic scenarios where mobility and speed are key. Below is a detailed comparison of their core features:
|
Feature |
Monopod |
Tripod |
|
Weight |
1–5 lbs |
5–10 lbs |
|
Load Capacity |
For lightweight setups |
Support heavier cameras |
|
Setup Time |
2–5 seconds |
10–30 seconds |
|
Stability |
Reduces shake by 40–65% |
Eliminates shake (95+%) |
|
Portability |
Easier to carry |
More cumbersome |
|
Cost |
Generally affordable |
More expensive |
Why Use a Monopod Instead of a Tripod?
Monopods offer three distinct advantages that tripods can’t match:
- Unmatched Mobility: Tripods tie you to one spot, but monopods let you move freely—whether you’re tracking a running athlete, following a bride through a venue, or hiking to a remote viewpoint. You can swing the monopod left, right, up, or down in an instant, without having to readjust multiple legs.
- Superior Portability: A lightweight monopod adds minimal bulk to your gear, making it perfect for travel. Many models even double as hiking poles, adding extra value for outdoor enthusiasts. Tripods, by contrast, often require a separate bag and can be a hassle to carry for long distances.
- Versatility in Restricted Spaces: As mentioned earlier, monopods are allowed in most venues where tripods are banned. They also work in tight spots—like narrow hallways or crowded streets—where tripods can’t be fully extended. This makes them a must-have for event photographers, journalists, and anyone shooting in urban or busy environments.
Is a Monopod Worth It?
Yes, a monopod is absolutely worth it if you shoot where movement, speed, or weight matters. For everyday travel, wildlife, sports, and even event photography, it is a practical upgrade that raises the quality of your work and expands where you can shoot effectively. You lose some of the full static stability a tripod offers, but what you gain in mobility, endurance, and responsiveness more than makes up for it.
How to Use a Monopod?

Using a monopod is simple, but a few tips will help you get the most stable shots:
- Adjust the height correctly: Set the monopod so that the camera’s viewfinder is at eye level. Most models have height markers on the telescoping sections—aim for a range of 58–64 inches for most adult shooters. Avoid extending the thinnest sections first; use the thicker, sturdier sections to support the weight.
- Plant the base firmly: Press the monopod’s rubber or spiked foot into the ground (spiked feet work best on dirt, grass, or gravel; rubber is better for concrete or indoor floors). Keep the pole vertical for maximum stability—leaning it too much can reduce its effectiveness.
- Use your body as a stabilizer: Stand with your feet shoulder-width apart, lean slightly into the monopod, and grip the camera with both hands. Rest your elbows against your body to minimize movement. For extra stability, press the monopod against your chest or shoulder while shooting.
- Pair with a head: While some monopods have built-in heads, adding a ball head or pan-tilt head lets you adjust the camera’s angle more easily. Look for a head that can support your camera’s weight—most entry-level heads work for cameras under 10 pounds.
- Practice tracking moving subjects: For sports or wildlife, keep the monopod loose enough to swing smoothly, but tight enough to maintain control. Use the monopod’s height to your advantage—lower it for low-angle shots or raise it to capture overhead action.
How Does a Monopod Work?

Monopods rely on two key principles: weight distribution and leverage. By transferring the camera’s weight from your arms to the ground, the monopod reduces the amount of movement caused by hand tremors or muscle fatigue. The telescoping sections let you adjust the length to match your height and shooting angle, while the locking mechanisms (twist locks or flip levers) keep the pole from collapsing under pressure.